Saturday, March 28, 2009

Honey Madeleines

Let's be honest: we all need a perfect Madeleine recipe. You know me, the one with the tiny kitchen where a muffin tin has at least four different uses -- I'm the last person who will tell you that you need this specific kind of brand/ingredient/cake-pan. And yet, I am telling you now -- you need a Madeleine pan and you need this recipe for honey Madeleines. Why? Because it's perfect.

Spring brings that out in me, the appreciation of simplicity, of new beginnings. It's in the air, the way the little buds all open up at the same time and this tree outside my window, this tree that was bare yesterday, suddenly shimmers with a pale green mist. Sure, I could bake, say, a brandied-cherry mascarpone cheesecake (interested?) or mix some Poma-limon-tinis for brunch, but truth be told, all I want is a cup of tea, a stack of these tender little cakes and the smells of spring. What can I tell you, I'm just that kind of a girl.

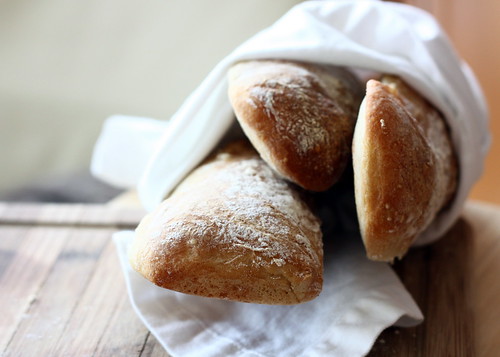
You might remember that way back when, I tried Dorie's Madeleines and I wasn't thrilled. Having made them again, I can definitely say that my technique was off at that time, so it's partly my fault, but out of the two recipes, this one comes out as a clear winner. It was soft, it was fluffy, it was a little crunchy on the outside with tender air pockets inside. Lightly sweet with an underlying taste and smell of honey, these little cakes are just begging to be glazed or simply dusted with a festive coat of confectioner's sugar. They will lift you out of your winter funk -- and that's not a promise I make lightly.
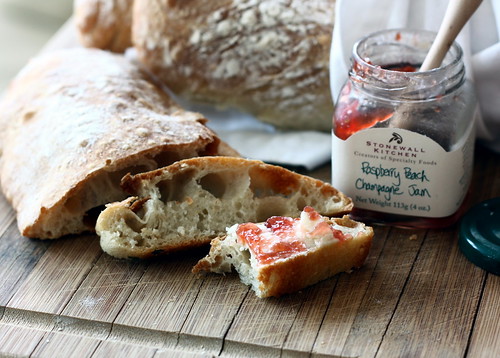
Honey Madeleines
Once Upon A Tart
(makes 12 full sized Madeleines or 24 minis)

[Note: I love this book and this recipe, but their instructions for Madeleines are kind of scant and assume a greater level of familiarity with Madeleines than I previously had, so I roamed the internet for tips and have compiled an all-you-need-to-know Madeleine tutorial. I'd like to say I learned all this by example and by trial and error, but really, it was mostly by error. :)]

3/4 cup all purpose flour
4 tbsp butter (plus more for buttering pan)
2 eggs, room temperature
1/3 cup granulated sugar
1 tbsp brown sugar
1 tbsp honey (I prefer to use dark, fragrant honey)
1 tsp vanilla or almond extract
1 tsp baking powder
pinch of salt

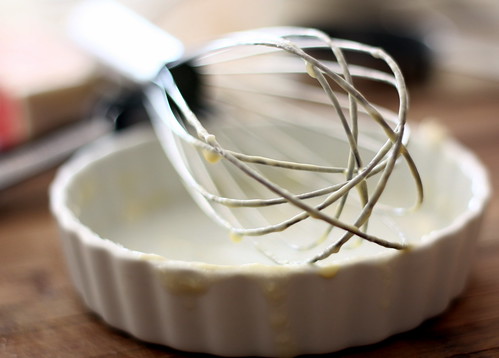
In a small saucepan or microwave, melt the 4 tbsp of butter (some people like to brown it, but I haven't tried that yet). Stir in honey and extract. Let cool to room temperature.

While the butter/honey/extract is cooling, whisk the flour, baking powder and salt together in a small bowl. For full disclosure, I have to tell you that for the best, the tenderest cookies, what you really need to do is sift the dry ingredients together, and possibly sift them twice (but if you are short on time or patience, or you are me, whisking is just fine).

Break the two eggs into a large bowl and add the sugars. Now, this part is really important - whip the eggs on a high speed for at least 3 minutes -- possibly as much as 5 -- until they are thick and light in color, and fall in a dense ribbon when you lift your beater out of the bowl. This is what gives Madeleines their airy texture, so don't skimp on the whipping.

With a rubber spatula, gently fold the dry ingredients into the eggs, being really careful not to deflate the eggs and mixing only until the flour disappears. Then, being just as careful, fold in the cooled butter/honey/extract mixture. I do this by pouring it down the side of the bowl and then swirling it around with the spatula until the texture is uniform.

Press a piece of plastic wrap against the surface to prevent a skin from forming and refrigerate for 30 minutes.

Turn the oven to 400F and brush your Madeleine pan with softened or melted butter. Brush it well - the worst is to be stuck prying your beautiful little cakes from the pan because you didn't butter it enough. Fill the molds about 3/4 of the way - don't worry, they will spread and rise as they bake. Bake until the Madeleines rise and the edges are browned. In practice, it's usually about 10-12 minutes for full sized cakes or 8-10 for minis. Please watch carefully because even 30 seconds extra makes a difference with these.

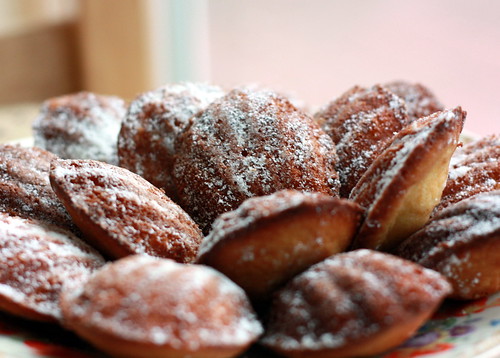
Take out the pan and tap it lightly on the counter to unmold the cakes and then carefully pry them out of the molds (I use a dull butter knife to help me there), arrange on plate and dust with confectioner's sugar. Usually, Madeleines should be eaten the same day they are made, but these were still totally awesome the next day.

To hump or not to hump, that is the question?

In my search for baking tips, I came across what I like to call as "The Great Madeleine Debate." By this, I mean the hump vs. no hump question. Some Madeleine purists insist that the perfect Madeleines need to have a distinct hump when coming out of the oven, and as such, this is the only kind they will allow to cross their venerated lips. The other purists counter with, "Aha, but even PARISIANS -- the ultimate authority on pastries in general and Madeleines in particular -- don't like their Madeleines to hump, and humping is not ladylike anyway, so there." They then get into a Madeleine-throwing fight and many cookies are sacrificed in the ensuing battle.

To me, all this "much ado about nothing" (I'm feeling very Shakespearean today) seems kind of silly (sorry, Madeleine purists). I mean, these are little cakes, not camels, right, so why would we insist on a hump? In short, my view is: as long as they taste great, I give them a pass, hump or no hump.

Continued after the jump...

Sunday, March 22, 2009

Strawberry Scones

Do you know what I love about scones?

1. One bowl, one spoon, your hands. Yep, I love anything that requires less than three utensils. What can I say, I'm a wuss when it comes to washing the dishes!
2. Anyone can do it. Scones were probably my first ever baking project (that turned out successfully - we won't talk about what came before that, it ain't pretty). Maybe that's why I have a soft spot for them.
3. Quick and freezable. Can I tell you, it takes me about 3 minutes to put scones together, and I can make a big batch and freeze half for unexpected company. Now that's what I call a totally awesome recipe!
4. Hello, delicious! Strawberry, blueberry, raisin, buttermilk, cheddar, herb, and just plain, they are all winners to me. My name is Irene and I'm a scone-aholic.

Because you guys are really important to me, I suffered on your behalf and tried out about six different scone recipes. There were cream scones from Dorie Greenspan's Baking and buttermilk currant scones from Tartine. There were non-traditional scones with eggs and scones so dry I had to practically drown them in Devonshire cream and lemon curd (it was terrible, I'm still scarred). However, one emerged victorious, and it was, strangely, not from a cookbook or an award-winning chef, but one that was hidden in a dark corner of my recipe binder, given to me years ago by a friend. The paper, bent into quarters from being tucked into the pocket of my jeans, just said: "Strawberry scones," followed by a few lines of instruction. I was intrigued. I was curious. And after I made them, I was sold. This is hands down the best scone I have ever tasted, anywhere.

Tender, moist (even on the second day!) and delicately sweet, studded with ruby red strawberries and sparkling with a simple topping of vanilla sugar, oh, these made me so happy! I used buttermilk, which gave them a nice tang to contrast with the sweetness of the strawberries, but I would love a re-match with blueberries and cream or cherries with a sprinkling of cornmeal. There are six left in the freezer now. Do you think I can count myself as "unexpected company"?


Strawberry Scones
(makes 6 large scones or 12 minis)

1 cup strawberries (or other fruit)
3 tablespoons sugar (granulated)
2 cups all-purpose flour
2 teaspoons baking powder
1/4 teaspoon salt
6 tablespoons butter, in cubes, slightly softened
2/3 cup half-and-half or cream or cold buttermilk

Topping:
1 tablespoon sugar

Preheat oven to 400 degrees. Lightly grease a cookie sheet.

If using larger fruit, cut into bite-sized pieces. Sprinkle fruit with 1/2 tablespoon sugar; set aside. Be sure to make the pieces small, or they tend to fall out of the dough. They'll still be plenty prominent in your finished scones.

Combine remaining sugar with flour, baking powder and salt. Add butter, using a pastry cutter or 2 knives to cut in butter (you may want to use your fingers to be sure butter is evenly mixed into flour). Stir in fruit; then add cream/half-and-half/buttermilk all at once. Use spatula to gently stir dough until it holds together.

Turn onto a lightly floured surface and knead a few times to incorporate dry ingredients. Be gentle so you don't break up the berries and don't overwork the dough. Sprinkle dough with flour if it gets sticky.

Press (pat) the dough into a circle 3/4 inch thick. If any berries peek out, push them into dough. Cut circle into 6-8 wedges, then transfer wedges to the cookie sheet, leaving at least 1/2 inch of space between them. Bake 15 minutes.

Sprinkle with sugar and bake 5-10 more minutes or until the tops are beginning to brown and spring back when you push them (this took another 15-20 minutes in my oven, but keep a careful watch and check every 5 minutes - you do not want dry scones!). (The sprinkling of sugar over the top for the last few minutes of baking creates a simple, sparkly topping.)

Continued after the jump...

Tuesday, March 17, 2009

Braised Baby Artichokes with Garlic, Thyme, and Parmesan

I have so many things to tell you guys, I don't even know where to start. I have been running around like a chicken with its head cut off in the past few weeks, working like crazy, going to concerts, reconnecting with old friends, and of course, baking, but you will hear all about that presently. I guess for now, I will start with the best and the most important - spring is finally here! Yes, our frigid 50F temperatures (please do not laugh, I own one jacket and it's not cut out for 50F) seem to be in abatement and the farmer's market is once again inspiring me with something more than potatoes and onions. Speaking of that, I visited the farmer's market in Santa Monica this past weekend with my mom! Going with her is really an adventure. She spins like a top through the crowded stalls, a petite bundle of purposeful energy, doing five things at the same time and somehow still managing to sample the cheese. I can't keep up with the woman, but it's always fun to watch her work her magic as our bags fill up with goodies. Check out a few pictures I managed to take while she was off charming the flower seller:


By the end of the morning -- even though I felt like I'd run a marathon and my mom was still as fresh as the strawberries you see in the photos above -- we were both eager to go home and do something with the bounty we scored at the market. Specifically, braised baby artichokes with garlic, thyme and Parmesan from my new favorite book, Chez Panisse Vegetables. Warming our hands over the stove and soaking up the juices with my favorite whole grain bread, we thought it was the perfect end to a perfect day.

I have to warn you, though, these little guys are addictive. Take it from someone who has an iffy relationship with artichokes and still kept eating and eating and eating them. And with a taste this hearty, warm and satisfying, and ingredients like artichokes, garlic, thyme and lemon, it's even harder to resist (resistance is futile... just had to put it in there for all the Star Trek geeks like me). I'm putting this on my party-dish circuit and I can't wait to make it again!


Braised Baby Artichokes with Garlic, Thyme, and Parmesan

1 lemon, halved
About 20 very small artichokes (as you can see in the photo, mine were slightly larger than "small", so I used about 15 and sliced them in half after peeling)
5 large cloves garlic, thinly sliced
1/3 cup olive oil (I dialed this back to 1/4 cup)
1 cup water
4 sprigs thyme
Salt
Parmesan cheese

Fill a medium-sized bowl with cool water, and squeeze 1 half of the lemon into the water.

Cut off all but about half an inch of the artichoke stems, and trim off the tops to remove any thorns. Break and peel off the outer layers of leaves until the tender, yellowish inner leaves show. (Irene's note: it's also possible to use bottled artichokes preserved in water for this. Shh... I won't tell. If that's what you are doing, skip to the next paragraph.) If you want, pare the ragged edges of the base where the outer leaves were torn off. If your artichokes are only small – as opposed to very small – cut them in half from stem to tip. If there is a choke inside, use a demitasse spoon (or something similar) to scoop it out. As you finish working with them, drop the prepared artichokes into the bowl of lemon water.

In a shallow, nonreactive pan combine the artichokes, garlic, olive oil, water, and thyme. Season lightly with salt, cover, and bring to a gentle simmer. Cook for 10 minutes, until the artichokes begin to soften, shaking the pan occasionally. Remove the lid, raise the heat slightly, and cook for a few minutes more, shaking the pan occasionally, until the artichokes are soft and tender. Salt again, and squeeze the other half of the lemon into the pan.

Serve the artichokes warm, with some of their liquid and with curls of Parmesan on top. (Irene's note: I would also have generous slices of warm farmer's bread or baguette to sop up the juices - that's the best part!)

Serves 4.

Continued after the jump...

Wednesday, March 11, 2009

Raspberry Madness Coffee Cake

So you know how everyone has a *thing* for a certain kind of food? Like, some people can't pass up chocolate and Nutella makes them weak at the knees. Some swoon for truffles and some will go to the ends of the earth and beyond for that really good croissant or cupcake. Me? I'm weird. Chocolate leaves me fairly indifferent and ice cream will get only very polite attention. Cheesecake might make me stop for a moment and contemplate, but eventually I will probably pass it up. But a really good roasted chicken -- the kind that warms the house and smells of garlic, lemon and herbs -- now that, that will get me running and pushing everyone out of the way. Also, my grandma's kugel and my mom's buttermilk-ricotta tart with raisins (that I will tell you about pretty soon, it's awesome), and, strangely, coffee cake. I love coffee cake. What is it about this unassuming little cake that gets me so excited? I don't know, but if there is coffee cake around, especially laced with a hefty dose of raspberries or blueberries, and maybe swirled with cream cheese, don't leave me alone with it unless you want to come back to some crumbs and a sheepish face. I can't control myself, people, I've tried.

Surprisingly, I've never actually made a coffee cake. Oh, I've made bundts and apple cakes and muffins, but for some unknown reason, an honest to goodness coffee cake has eluded me. Until last weekend, that is. You see, when you've had a hell of a week, and work felt like a boxing rink with you as the referee, emails as boxing gloves and no rules, and the weekend just added to the exhaustion, all you really want is to curl up on the couch with a steaming cup of hot tea and a big (and I mean BIG) slice of raspberry coffee cake and shut the world off. If the world had an off switch, that is. Which, when I'm alone with my coffee cake, it apparently does. You've been warned.

For my maiden voyage in coffee cake making, I chose Deb's Big Crumb Coffee Cake because, frankly, I trust a New Yorker to choose a coffee cake, and especially I trust Deb to choose any kind of food. Now, the cake part of this cake was really delicious - soft, moist and fragrant, with a lovely crumb that cushioned the ungodly amount of raspberries I dumped into it. But I have a bone (a crumb?) to pick with the topping. Maybe it's because I didn't use brown sugar, but raw Hawaiian sugar, and maybe it's because I'm the only person in the universe who likes less crumb and more cake (I accept my limitations in this regard), I have to say that, while the topping was very good, it left me craving my aunt's cherry coffee cake where she uses the cold-diced butter method for the streusel rather than this melted-butter one. Next time, I am keeping the cake part of the recipe and re-doing the topping in the way that comforts me the most and gives that extra bit of a crunch that I was missing (my aunt dices cold butter with flour, sugar and cinnamon - oh, it's so good). Overall, though, I have to say my first experiment with coffee cake can be deemed a great success, so thanks Deb for another winner of a recipe!


Raspberry Coffee Cake
via Smitten Kitchen

Ingredients:

Butter for greasing pan

For the raspberry filling:
1/2 lb fresh or thawed raspberries (this works out to be about a cup, but I used a cup and a half)
1/8 to 1/4 cup of sugar, depending on the tartness of the fruit

For the crumbs:
1/3 cup dark brown sugar
1/3 cup granulated sugar
1 teaspoon ground cinnamon
1/2 teaspoon ground ginger (I didn't use this)
1/8 teaspoon salt
1/2 cup melted butter
1 3/4 cups cake flour (or all purpose worked well too)

For the cake:
1/3 cup sour cream
1 large egg
1 large egg yolk
2 teaspoons vanilla extract
1 cup cake flour (again, all purpose was just fine)
1/2 cup sugar
1/2 teaspoon baking soda
1/2 teaspoon baking powder
1/4 teaspoon salt
6 tablespoons softened butter, cut into 8 pieces.

1. Preheat oven to 325 degrees. Grease an 8-inch-square baking pan. For filling, toss the raspberries with sugar. Set aside.

2. To make crumbs, in a large bowl, whisk together sugars, spices, salt and butter until smooth. Stir in flour with a spatula. It will look like a solid dough.

3. To prepare cake, in a small bowl, stir together the sour cream, egg, egg yolk and vanilla. Using a mixer fitted with paddle attachment, mix together flour, sugar, baking soda, baking powder and salt. Add butter and a spoonful of sour cream mixture and mix on medium speed until flour is moistened. Increase speed and beat for 30 seconds. Add remaining sour cream mixture in two batches, beating for 20 seconds after each addition, and scraping down the sides of bowl with a spatula. Scoop out about 1/2 cup batter and set aside (note: the batter will be very thick and hard to spread, and there won't be much of it - that's ok).

4. Scrape remaining batter into prepared pan. Spoon raspberries over batter. Dollop set-aside batter over raspberries; it does not have to be even.

5. Using your fingers, break topping mixture into big crumbs, about 1/2 inch to 3/4 inch in size. They do not have to be uniform, but make sure most are around that size. Sprinkle over cake. Bake cake until a toothpick inserted into center comes out clean of batter (it might be moist from raspberries), 45 to 55 minutes. Cool completely before serving.

Continued after the jump...

Monday, March 9, 2009

KitchenAid Sale!

You guys! KitchenAid is having a 30% off sale on all their products! Also, they are offering a $30 rebate for their Artisan Stand mixers and a $40 rebate for the 600 series! Ok, I know that's a lot of exclamation marks, but seriously, this was too awesome not to share. The sale ends tomorrow (I just found out about it 5 minutes ago), so I hope that any of you who have KitchenAid dreams can take advantage of this offer.

See this link for details: http://www.fatwallet.com/forums/hot-deals/904572/. By the way, FatWallet is a kick-ass site!

The coupon code is: REBCC30
http://www.shopkitchenaid.com/

Continued after the jump...

Thursday, March 5, 2009

Pain à l’ancienne baguettes

There was a time when I thought that in order to have a great relationship, two people must have a lot in common with each other. I sought out guys who had the same interests as I did - who were passionate about art and music, who could quote Shakespeare and tell me about the Tokyo Imperial Palace, and who could talk about books and politics until the wee hours of the morning. And when I found them, I always wondered what was missing.

Then -- and ironically -- when A. and I were already engaged and I was having a panic attack and frantically thinking of running away to Rome a la Audrey Hepburn (I was very specific about Rome and there had to be a scooter), I had a "duh" moment. One of those moments when you realize something that, in retrospect, seems as obvious as the nose on your face, but at the time is a huge epiphany. I realized that our differences are what makes us such a strong couple. It just works for us, it's uniquely our own. It doesn't matter that I like French chanson and he likes Metallica, that I could spend a whole day walking around Paris and he prefers to lay on the beach in Hawaii or that he reads modern Japanese literature and I love Henry James. We have the important things -- the really important things -- in common, and we are better and happier as a team than we are on our own. And, as A. put it (gently and patiently enough to chill me out - in other words, using the tone of a SWAT team negotiator trying to disarm a crazy person with a time bomb), we have our love in common. What can I say, we have our romantic moments too.

As you can see, I didn't run away to Rome. And I can even accept our differences with a sense of humor now, like him eating the baguette warm from the oven, breaking the golden crust with a crunch heard in the next room, and me wanting to wait until it cools completely and slather it with butter and jam. God, I am so patient with his little quirks, no? ;)

This recipe comes by way of Jude at Apple Pie, Patis, & Pate - a blog that I've been reading with great pleasure. Thanks to him, I understand why these baguettes came out a bit flatter than I anticipated. Apparently, I used the wrong flour that was too soft to help the dough firm up properly. Since I'm so new to this whole baking-with-yeast thing, I didn't realize that my usual General Mills flour wasn't going to cut it. Next time, I'm definitely using King Arthur. Oh, and by the way, there will definitely be a next time. These baguettes were wonderful. The crust was a lovely deep shade, and crunchy too, hiding chewy soft insides with those beautiful irregular air pockets we all know and love. The labor was pretty minimal (except the soft flour and sticky dough, ugh) and I cannot wait to make it again. Thanks, Jude, for the recipe and for being so kind to answer my panicky emails with questions (omg, my dough is sticky, help! what do you mean, the flour is "too soft"??? aaaah!).

Pain à l’ancienne Baguettes


makes four 12- to 16-inch baguettes

Ingredients:
unbleached all-purpose flour: 4 cups/17.6 oz/500 g
water, ice cold: 1 cup + 6 tbsp/11.5 oz/325 g

water: 3 tbsp + 1 tsp/1.8 oz/50 g
salt: 1.5 tsp/.3 oz/9 g
instant yeast: 1.5 tsp/.2 oz/5g

Notes:

* Best to use King Arthur all-purpose flour or another flour with a higher protein content than regular supermarket all-purpose flour.
* Peter Reinhart’s pain à l’ancienne in The Bread Baker’s Apprentice is based on a method very similar to this recipe. In Reinhart’s version, the salt and yeast are added before refrigeration.

Directions:

Mix together the flour and the ice-cold water until a shaggy ball of dough is formed.

Knead 4 to 6 minutes, until the flour is thoroughly hydrated and a smooth ball of dough is formed.

Cover with plastic wrap or store in an airtight container. Refrigerate for at least 8 hours and up to 2 days. The bread will be sweeter the longer the dough rests (this process of resting the dough before adding yeast is called autolyse).

Add the additional water, salt, and instant yeast to the cold dough. Knead until the water is completely absorbed, about 6 to 10 minutes. The dough will be very sticky.

The dough will initially have the consistency of chewing gum and will not readily absorb the additional water.

Ferment #1 90 minutes at room temperature

Using gravity and a bench scraper to help you, lift the dough to stretch it into a long rectangle and put it back on the counter with the short side facing you. The fold it into thirds vertically, like an envelope, and then fold again horizontally.

Ferment #2 90 minutes at room temperature

Stretch and fold again.

Ferment #3 2 to 3 hours at room temperature, or until almost doubled
in size

Preheat Oven 460ºF / 240ºC

Divide 4 equal pieces using a lightly moistened bench scraper

Preshape: On a lightly floured surface, gently shape each piece
into loose ovals by tucking the sides underneath the
pieces of dough. Handle as gently as possible to avoid
degassing.

Pain à l'ancienne French Baguettes Shaping

Rest: 10 minutes

Shape: Stretch gently into strips, about 12 to 16 inches long.

Steam: 1 cup of boiling water poured in a heavy steam pan
(preferably cast iron)

Bake: Bake for 8 to 9 minutes at 460ºF / 240ºC. Rotate the
loaves and bake for another 10 to 15 minutes, until the
crust is deeply browned. The thickest part of the
baguette will register 205ºF / 91ºC when done.

Cool: At least 30 minutes

Continued after the jump...