Monday, July 27, 2009

Banana-Poppy Seed Muffins

IMG_1876

I want to share some wonderful news with you - last week, I became an aunt of a beautiful baby girl! She has ten perfect fingers and ten perfect toes and is otherwise absolutely adorable, squeezable and kissable. And she already likes her auntie, which she demonstrated by not screaming her head off when I picked her up. That scored some big brownie points in my book.

IMG_1834

My favorite thing to bring to new moms is food. I figure that by the time I get there, the baby clothes cuteness is wearing a bit thin and a hot dinner is more welcome than another pink onesie. Although, I do have to admit that the charm of pink onesies cannot be denied.

IMG_1865

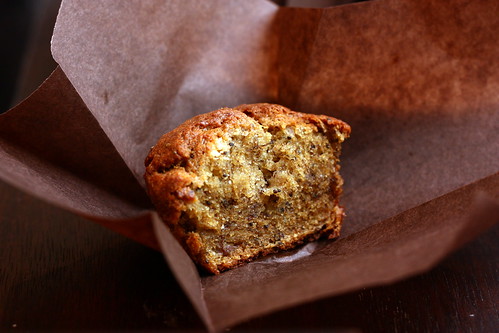
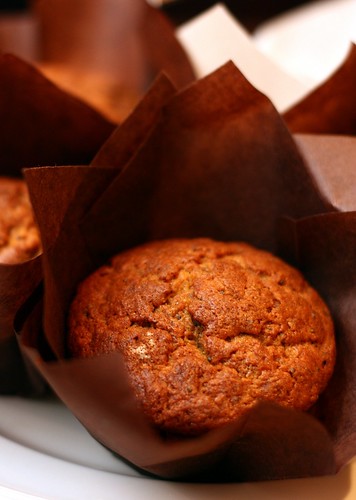
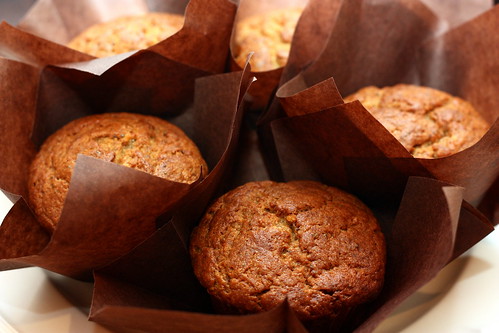
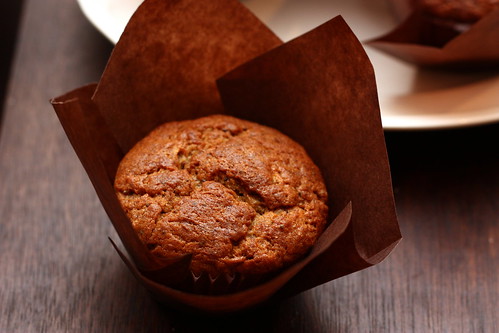
I looked through my cookbooks for just the right thing to make, and when I came across these muffins, I knew that this was "it." Everyone likes banana muffins, and the poppy seeds give them an interesting twist that keeps the bit of crunch without making me worry about nut allergies. The addition of whole wheat flour and four bananas keep them on the healthier side, hearty enough for breakfast or just a snack while still moist and delicious. Lastly, I was attracted to the fact that, if wrapped individually, these muffins can be thrown into the freezer - a quick reheat in the microwave or toaster oven and you have a freshly baked muffin anytime you want. I might just be tempted to make another dozen or two for myself!

IMG_1829

Banana-Poppy Seed Muffins
from my favorite cookbook of the moment, Once Upon a Tart (it's wonderful, seriously)

8 tablespoons (1 stick) unsalted butter, softened
1 cup all-purpose flour
1 cup whole-wheat flour
1 tsp baking powder
1 tsp baking soda
1/4 tsp salt
1 tablespoon poppy seeds
1/2 cup of sugar
4 very ripe bananas, mashed (the authors emphasize that the bananas must be very ripe, even black)
2 large eggs
1/4 cup cold milk
2 tsp vanilla extract

Preheat the oven to 400F and butter or spray 12 regular or 6 extra large muffin cups.

Whisk the flours, baking powder, baking soda, salt and poppy seeds together in a medium bowl.

In a separate bowl, cream the butter and sugar until very light and fluffy, about 5 minutes. Add the mashed bananas and continue mixing on high until the bananas are blended in completely. Lower the speed to low and mix in the eggs, one at a time, until incorporated (about a minute), and then mix in the milk and the vanilla.

Gradually add in the dry ingredients just until the flour disappears - do not overmix.

Divide the batter among the muffin cups and bake for 30-40 minutes or until a tester comes out clean.

To freeze, allow muffins to cool to room temperature. Then wrap each individually in two layers of plastic wrap. Alternatively, set the unwrapped muffins on a tray and freeze for an hour or so (flash freeze), and then store in a freezer-safe ziplock bag. As far as I can tell, they will keep for about 2 months.

Continued after the jump...

Saturday, July 18, 2009

Peter Reinhart's Challah

IMG_1911

Friends, I am in a quandary. I need your help. See, for years, I have been traumatized by challah. No, I don't mean that I've been chased around by the Jewish Sabbath bread a la "Attack of the Killer Tomatoes," or that challah haunts my nightmares, or anything like that. To be more precise, I've been traumatized by baking challah.

IMG_1897

My first challah experiment came from a book (we will leave it nameless here) that purported to give you an "authentic" challah recipe. This was the first bread that I had ever attempted to bake and I was a little (a lot) unsure of myself. To make a very long story very short, I forgot to add the eggs to the dough. Yeah, now you know the shameful skeleton in my closet. I forgot to put eggs into egg bread. I made the recipe again, with the wind taken considerably out of my sails, but I might as well have not made it at all because it tasted nothing like the challah I knew.

IMG_1917

Over the next eight years, I've shied away from challah, looking for that "perfect" recipe, not daring to try it again. Failure is not something I deal with well, as you can see. So when I saw Peter Reinhart's recipe, I thought, "bingo!" because, I mean, he's Peter Reinhart! Right? ... This story does not have a happy ending because, although the challah turned out very tasty indeed, it's still not the challah that I'm used to. It somehow wasn't eggy enough or sweet enough, or rich enough or something that's undetectable and yet you know it's there. It's a great bread and we've already gone through one of the two loaves, but... it's just not "the" challah.

IMG_1924

Is it my technique? Is it the recipe? Is it that I'm cursed with forever making the wrong challah? Please help. If you have any, and I mean any advice (techniques, your favorite recipes, sob stories), please share them with me. I'm ready to try again, but I need inspiration. You can find the recipe for Peter Reinhart's challah here (in the Google preview of his "Baker's Apprentice").

IMG_1929

Continued after the jump...

Tuesday, July 14, 2009

My First Meme

Santa Monica

Recently, the delightful Danielle from Delightfully Sweet tagged me for a meme. Now, I'm usually the worst at keeping up with these things (abject apologies to anyone who tagged me and I totally forgot about it) and I never know what to write. I think my life is pretty exciting, but the details that make it so exciting for me would put all of you guys to sleep, so instead, I am going to take you on a short walk of my neighborhood. If you haven't figured it out yet, I live in sunny and beautiful Los Angeles. To be exact, I live in a sunny and beautiful urban suburb of Los Angeles called Santa Monica, which is pretty much the best place in the world and has the additional benefits of being right on the beach and having even milder weather than the rest of the city. What can I say, I'm one lucky girl! Without further ado, follow me!

Santa Monica

I always feel strange in land-locked cities because I grew up practically smack dab up against the ocean. Santa Monica is a fun and vibrant community with lots to do and even more to see, but at some point, if you continue walking west, it just ends and there is this vast expanse of blue on blue and the sound of the breaking surf and the salty, tangy smell of the water. When I have a free hour, I like to bring a book here and sit on one of the benches overlooking the ocean, pretending to read, but really just lifting my face to the warm sun and thinking about how cool it is to actually live here.

Santa Monica

Santa Monica

It's always a point of contention between writers and poets whether the ocean makes one feel really small or really big. To tell you the truth, it doesn't make me feel either way, but it gifts me with peace. The water can be gray, azure, turquoise or indigo, or a multitude of other colors, but it washes away the dust of daily life and refocuses my mind when I most need it. It's a very Californian thing to say, I know. Then again, I am a Californian, and I dare you to try standing two feet away from the Pacific ocean and not feeling almost entirely happy.

Santa Monica

Santa Monica

After an hour of such fulfilling philosophical reflections, I felt a very natural need, as would almost any girl, to get a cup of coffee and look into Sur La Table. Thankfully, it was only a short walk from the ocean that I could satisfy both of these desires.

Santa Monica

Santa Monica

Two blocks away from the beach, there is a long street blocked off for pedestrians with colorful shops, cafes and street musicians. There are tourists and locals and high school kids with skate boards and tattoos sitting at Johnny Rockets next to families with lots of kids. I don't always come here because it gets quite busy, especially during the summer months, but sometimes, I just can't resist the magic of people watching from a Greek cafe and then browsing for new books at one of the big book stores. Are these grass dinosaur fountains, you ask? Why, yes, they surely are. :)

Santa Monica

It was a wonderful day, the kind when the colors are bright and crisp, the breeze is gentle on your skin, and there seem to be people everywhere, walking and laughing and enjoying the perfect July weather. This guy tuned his guitar for a long time while the kids watched, sipping an iced coffee and making up his mind which songs he wanted to start with.

Santa Monica

As usual, time had run away from me, and I had to walk back to my car and get on with my day, but on my way there, I allowed myself a last pleasure and peeked behind the wrought iron gate of the beautiful Fairmont-Miramar Hotel. My parents and I have gone there for dessert in the evenings ever since I can remember, to sit out on their patio under the fairy lights and crunch on the sugar sticks they serve with their coffee. The tinkling of the fountain brought my mind back to the very different sounds of the ocean and I knew that I wanted to share my day with you, my friends. Thank you for coming back to my little corner of the blogosphere and sharing your thoughts with me.

Santa Monica

Continued after the jump...

Sunday, July 12, 2009

Zucchini & Summer Squash Gratin

Zucchini & Summer Squash Gratin

I used to think of myself as a spring/fall girl. At least, that's what I always told people. I feel like I come alive in April and October with its golden sunsets and apple pies has that certain ephemeral charm. But I think I might have been wrong. People, I think I am an undercover summer lover.

Zucchini & Summer Squash Gratin

Maybe it's just that this particular summer has me bewitched. This summer's been simply glorious. I don't remember skies ever being quite this blue or the breeze being quite this gentle. The temperature hovers around a perfect 80F and the farmers' markets are bursting with plump, velvety cherries and red-cheeked nectarines. It all has my head spinning just a little.

Zucchini & Summer Squash Gratin

This gratin was the product of my Saturday morning farmers' market loot and it just tastes like July and picnics in the park and lazy dinners on the porch. Unlike the hearty, cheesy potato gratins we all love when the thermometer dips, this is light and bright with flavors, the soft zucchini and summer squash getting a little zing from a sprinkling of feta and a dash of lemon juice. If, like me, summer has you firmly in its hold, this dish will hit just the right the spot.

Zucchini & Summer Squash Gratin

Zucchini & Summer Squash Gratin

Zucchini & Summer Squash Gratin
serves about 4-6

2 zucchini
2 summer squash
4 eggs
1 cup milk
4 oz feta cheese, crumbled
2 teaspoons dried or fresh thyme
1 tbsp lemon juice
salt and pepper to taste

Turn the oven to 350F and butter and 8x8 in. baking dish or 4 individual baking dishes. Slice the zucchini and the squash into thin slices, about 1/4 of an inch. Toss the vegetables with the lemon juice.

Make a layer of the slices on the bottom of the baking dish, overlapping each piece. I made separate layers of zucchini and separate layers of squash, but it doesn't matter, you can mix it up. Sprinkle with salt and pepper. Continue until you have layered about half of the vegetables. Then, spread half of the feta on top. Continue layering until the vegetables reach just below the top of the baking dish. Sprinkle with some more salt and pepper. Depending on the size of the vegetables, you may have some slices left over; roast them and throw them into a pasta later.

Whisk the eggs and milk together and pour over the gratin. The liquid should almost cover the vegetables. Then, spread the rest of the feta on top and sprinkle with thyme. Bake until the vegetables are tender and the filling is set, about an hour (the filling will puff, but don't worry, it will settle down once you take it out of the oven).

Continued after the jump...

Tuesday, July 7, 2009

Sweet Cherry Pie

Cherry Pie

If there is another vehicle in the world as perfect for showcasing cherries as is a flaky, delicious pie crust, I dare you to find it and show it to me. Oh, sure, there are clafoutis and jams and cobblers and coffee cakes, but after making my first cherry pie (indeed, my first pie) this weekend, I am firmly convinced that all these other things are just filler in case there's no time to make pie.

Cherry Pie

I didn't grow up here and I didn't grow up with pie, but when I took the golden, flaky, bubbling, fragrant pie out of the oven, with the red droplets of cherry juice and sugar swirling on the hot baking sheet, I knew that I had missed out on something very important. If food can be poetry, this is it - a deceptively simple, charming, loving and brilliant ode to the American culture.

Cherry Pie

Since this was my first time making a pie crust, I had no idea what to expect. And, not having had home-made pies very often, I still have no idea whether I got it right. I think that I could have made my dough flakier by handling it less, and I'm sure my technique was totally off. I didn't think the lattice did a very good job of holding in all the filling, so next time, I'll just go with a simple double crust. I'm sure there were other shortfalls that would prevent this pie from winning a pie contest. And yet, I can tell you for sure that this pie was the bomb. For real. Go and make it, people. This is the BEST way to enjoy the cherry season other than just eating them straight.

Cherry Pie

Cherry Pie

Sweet Cherry Pie

Pie Crust - makes a double crust
(compiled from different recipes)
3 cups all purpose flour
2 1/2 sticks (10 oz) very cold or frozen unsalted butter
2 tablespoons sugar
1 teaspoon salt
3-5 tablespoons of iced water

Cherry Filling
(Joy of Cooking)
5 cups pitted cherries (about 2 1/2 lbs unpitted)
3/4 cup sugar for sweet cherries or 1 1/4 cup for sour cherries
3 to 3 1/2 tbsp. cornstarch or quick-cooking tapioca
2 tablespoons water
1 tablespoon fresh lemon juice
1/4 teaspoon almond extract (optional)

Make the crust: Whisk together the flour, sugar and salt in a large bowl. Quickly cut the cold butter into small pieces (I cut each stick into 16 pieces). Make sure to keep all ingredients cold, even if that means stopping and sticking things in the refrigerator for 5 minutes or so to cool off.

With a pastry cutter, cut the butter into the flour mixture until the largest piece of butter is no bigger than a pea. Sprinkle 2-3 tablespoons of water on top and mix gently with a fork. If pieces of the dough stick when you pinch it between your fingers, it's good - if not, add more iced water, one tablespoon at a time until the dough holds together. Turn it out onto a floured surface and knead briefly to incorporate the dry ingredients, if any. Divide in half and form each half into a disc. Wrap each disc in plastic wrap and refrigerate for 1 hour to overnight.

Remove from the refrigerator and leave on the counter for at least 10 minutes to allow the dough to come to room temperature. Butter or spray a pie pan. On a well-floured surface or between two sheets of plastic wrap, roll out two rounds, about 12 inches each. Fit one of the rounds into the pie pan and cut away excess dough, leaving a little on the edges for crimping. Refrigerate both the pie pan with the bottom crust and the rolled out top crust.

Make the filling: While the crusts are refrigerating, pit all the cherries and place them in a large bowl. Sprinkle the sugar and cornstarch over the cherries and then pour the water and lemon juice on top. If you wish, add the almond extract. Gently mix until no trace of sugar or cornstarch remains. Leave for 15 minutes and then drain the cherries of most of the liquid.

Assemble the pie: Pour the cherries and the remaining liquid into the prepared crust. Fit the second crust on top of the cherries and either prick it all over with a fork or cut several vents in it. Or, you can make a lattice by cutting the crust into thin strips and fitting the strips over the top crust in a lattice pattern (like so).*

Turn the oven to 425F and fit a rack to the lower third of the oven. Put the pie dish onto a baking sheet lined with foil or parchment paper (to catch the juices) and bake for 15-20 minutes. Then, turn down the heat to 350F and bake for a further 45-60 minutes or until the top is golden brown and the juices are bubbling. Cool on a rack for several hours and serve with ice cream.

*At this point, the pie can be frozen for up to several months (flash freeze and then wrap it very very well). To bake a frozen pie, turn the oven to 450F and bake the pie on the lower rack for 15-20 minutes, then turn down to 375F and bake it for a further 45-60 minutes or until the top is golden brown and the juices ar bubbling.

Continued after the jump...

Friday, July 3, 2009

Honey Nectarine Pancakes

IMG_1149_01

As all Russian men, my dad is a disaster in the kitchen. And yet -- and yet! -- he can turn out a perfect breakfast on any given Sunday. No one knows what mysteries of the universe allow him to handle kitchen equipment with such agility on this particular day, when on the other six days of the week he can barely operate the toaster oven, but breakfasts are "his thing" on Sundays and growing up, I have to confess it was my favorite meal of the week.

Food Photos1-23

My dad's pancakes are soft, fluffy and tender, but not as thick as the ones usually made here, and they always include a surprise - sauteed apples, diced peaches, maybe even strawberries with a bit of sugar. I haven't had dad's pancakes for a while and this morning, when I picked up some gorgeous nectarines at the market, I got nostalgic for them and had to make them for myself. After all, I'm a big girl now and I can't run to my daddy for every little thing, can I? (I can and I do, but at least I can give him a break on the pancakes once in a while). :)

IMG_1095

Nectarines and honey are a combination made in heaven and they work beautifully together in these pancakes. I replaced a teaspoon of sugar in the recipe with a tablespoon of honey and I also drizzled a little honey over the top. The softened nectarines and the mild taste of the honey complement each other perfectly, but of course, feel free to replace the nectarines with apples, blueberries, bananas or whatever else is in season.

Happy Independence Day to all my American readers! (and happy "Day We Finally Got Rid Of Those Pesky Colonists" to the Brits!) Have a happy and safe weekend, everyone!

IMG_1166
IMG_1105

Honey Nectarine Pancakes
(makes about 12 medium sized cakes)

Dry Ingredients
1 1/4 cup all purpose flour
2 tsp sugar
1 tsp salt
1 1/2 tsp baking powder
1 tsp baking soda

Wet Ingredients
2 eggs
1 1/5 cup buttermilk (or milk, in a pinch)
1 tbsp honey

2 ripe nectarines

First, bring a pot of water to a rollicking boil. With a small paring knife, score the nectarines on the bottom (cut a little cross in the skin), and then drop the fruit into the boiling water for 2 minutes. Fish them out and rinse under cold water. Peel the skin off starting with the place where you scored the nectarines. If the nectarines are ripe, the skin should come off pretty easily. This also works with peaches. Core and dice the nectarines into bite sized squares.

Now, heat a little butter in a frying pan on medium heat. Whisk all the dry ingredients together. In a different, largish bowl, whisk all the wet ingredients together. Add the dry ingredients to the wet ingredients and mix with a wooden spoon or spatula until you can't see the flour anymore. Make sure to get to the bottom of the bowl because flour is tricky and likes to hide down there. The batter will be pretty lumpy, but that's ok.

With a small ladle, drop a little bit of batter onto the frying pan to make cakes about 3 inches in diameter (or whatever diameter you like them, really). Drop a few nectarine pieces on top of each pancake. When you see bubbles forming on top of the pancakes, flip them over for another 30 seconds to 1 minute. Continue until you're out of batter (if you'll be making lots of pancakes, heat the oven to 100F and store the finished pancakes on a cookie sheet in the oven to keep them warm). Serve drizzled with honey.

Food Photos1-24

Food Photos1-21

IMG_1125

Continued after the jump...