Sunday, December 27, 2009

Cinnamon Walnut Rugelach

IMG_5160

Have you ever worked with cream cheese dough? If not, count yourself lucky, and if yes, you will understand when I say that cream cheese dough is a huge pain to work with and should only be attempted when you're home alone (so at least no one can hear you swearing like a sailor and throwing floured utensils at the wall).

12-06-13

I gotta be honest with you, this dough almost broke me. It was so soft, so sticky (even after proper chilling), so unwilling to do what I wanted it to do, that I almost gave up. My kitchen looked like a bag of flour exploded all over it and soft, sticky bits of dough snuck into every little crevice. I was so frustrated, I almost tossed dough, flour and all into the trash. Hoo boy, am I glad that I didn't!

12-06-12

Because, as it turns out, the best things in life are worth the effort, and these little rugelach definitely fall into that category. It's something of an epiphany when you first bite into this pastry that puffs up and is soft and delicate and crunchy at the same time, the sweetness of the filling perfectly balancing the tang of the cream cheese in the dough. It's addictive. If you can eat less than five, I take my hat off to you, because no one with whom I shared these could hold themselves back.

If you decide to make these, arm yourself with a lot of patience, a lot of flour and a good bench scraper. Flour the heck out of your surface, flour the heck out of your dough and flour the heck out of your rolling pin. Keep the dough cold and the cursing to a minimum. And trust me, it's all going to be worth it. This - this is what bliss tastes like with a cup of coffee.

IMG_5190

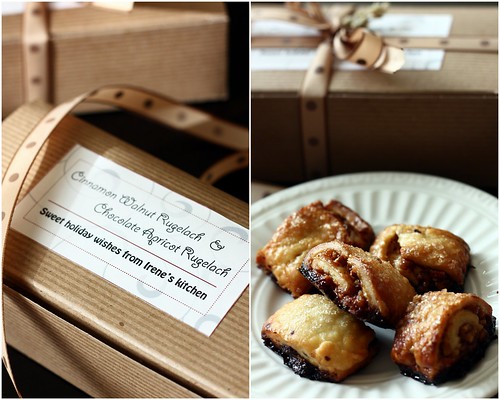
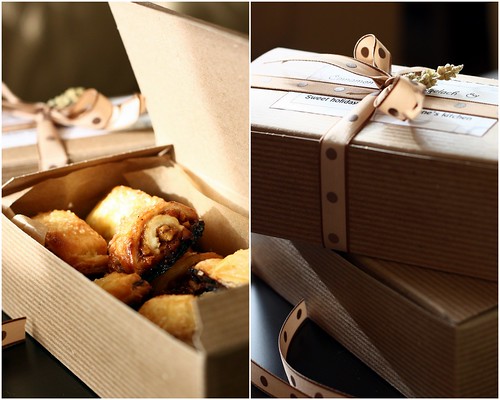
Walnut and Cinnamon Rugelach
slightly adapted from Desserts from Chanterelle

(I added some chocolate to these, and though it tasted fantastic, the chocolate melted out of the filling and created a dark brown crust on the bottom of the cookies, making them look like they burned a little. In other words, I do not recommend this addition.)

Dough
8 tablespoons butter, at room temperature
4 ounces cream cheese, at room temperature
1 cup flour, plus more for rolling dough
1/4 tsp salt
1 teaspoon sugar (I increased to 2 tablespoons)

Filling
1 cup (4 ounces) finely chopped walnuts
1/2 teaspoon cinnamon
1/2 cup (2 ounces) currants (I omitted)
1/4 cup granulated sugar
1/8-1/4 cup turbinado sugar, for topping

1 egg, for egg wash

Yields 32-36 cookies

Make the dough - using a stand mixer with a paddle attachment, beat the butter and cream cheese on medium speed until light and fluffy (5-8 min). Decrease speed to slow and add the dry ingredients, beating until thoroughly combined. Rev up the mixer to medium for 15 seconds. Divide the dough in half and wrap each half in plastic, pressing to shape it into a disc about 1 inch thick and refrigerate for 2 hours or overnight.

Make the filling - in a bowl, toss the sugar, chopped walnuts, currants if using and 1/4 cup of sugar.

Roll the dough - a.k.a. the tricky part:

Flour the heck out of your rolling surface and your rolling pin. Working with one batch of dough at a time (leave the second in the refrigerator while rolling the first), roll the dough into a 6 1/2 x 16 inch rectangle. Roll quickly, lifting the dough with a bench scraper as you are rolling and re-flouring underneath. Use a bench scraper or a pizza cutter to trim the dough into the desired dimensions.

Brush off excess flour and then brush the dough with some egg wash and spread half the walnut-cinnamon filling on top, leaving a 1-inch wide strip of dough clean on the long side (the 16" side). Starting with the edge opposite the clean one (the other 16" side), tightly roll the dough into one 16" long roll. When you reach the strip of dough without topping, apply a little pressure to seal the seam and roll it so the seam is on the bottom.

At this point, I would recommend to cut the dough in half (yielding two 8" rolls), wrap each roll in plastic wrap and refrigerate for 30 min-1hr. Repeat with the other half of the dough. [The logs can be stored in the refrigerator for 24 hrs or in the freezer for 1 week].

Baking - preheat the oven to 350F. Glaze each log with the remaining egg wash and sprinkle the top generously with turbinado sugar. Slice into 1 inch cross-sections and place on a cookie sheet, 1 inch apart. Bake for 15-18 minutes, or until golden on top. Rotate the cookie sheet half-ways through the baking time to ensure even baking.

Continued after the jump...

Monday, December 21, 2009

Happy holidays!

Season's Greetings

Best wishes for the holidays, from our family to yours. Thanks for making this little corner of cyberspace so warm and inviting!

Continued after the jump...

Saturday, December 12, 2009

Perfect Eggnog

IMG_5131

In those dark days long ago, when I was still afraid of the kitchen, I avoided eggnog like the plague because it always seemed to come from a paper carton at the supermarket and tasted like... well... like you would need a whole lotta Bourbon to soften the blow. As you can imagine, that type of thing couldn't go on, so I got out there and tried a few recipes, and there emerged something so divine, so transcendent, so smooth and creamy and I've-died-and-gone-to-heaven good, that I look forward to the holidays every year just so I have a chance to make this eggnog again. Don't get me wrong - I *really* love getting together with my family, eating, laughing and exchanging presents; but in the back of my mind - in the very back, where chocolate and creme brulee and tarte tatins dwell, the thought of this eggnog gives me a warm glow until the time when I can rush to the stove and stir and stir and pour and then drink (ahhhh) and then I get a warm glow of an entirely different kind.

IMG_5132

Happy Hanukah to my Jewish peeps! May the light and miracles of this holiday shine in your heart and in your family the whole year.

IMG_5140

Perfect Eggnog
Williams-Sonoma recipe
(serves 6-8 small cups)

Note: Because everyone prefers a different bite to their eggnog (and some, like me, drink it without alcohol - I know, the shame!), I like to pour the eggnog into small cups and let each guest add his or her own choice of spirits. You can do this, or you can just mix in about a cup full of rum, brandy or Bourbon before serving.

Eggnog:
2 cups of milk, divided
6 egg yolks
1 cup sugar

Topping:
1 cup cold whipping cream
1/2 tsp vanilla extract
1 tablespoon sugar
ground cinnamon
ground nutmeg

Mixers:
Brandy, Bourbon, dark rum

In a small, heavy bottomed saucepan, whisk together the egg yolks, 1 cup of milk and 1 cup of sugar. Simmer on low for about 8-10 minutes, stirring often, until slightly thickened. If it's not thickening, turn up the heat a little, stirring constantly so as not to cook the eggs. Remove from heat, stir in the remaining cup of milk and let cool. Pass cooled mixture through a fine-mesh sieve (to get rid of any errant cooked egg yolks) - this is a very important step!

Whip heavy cream, sugar and vanilla extract to soft peaks.

If desired, stir in 1 cup of brandy, Bourbon or dark rum right before serving. Serve in small cups with a dollop of whipped cream and a sprinkle of cinnamon and nutmeg. Can be served very cold, but it's also really good when it's just slightly warm.

Continued after the jump...

Wednesday, December 9, 2009

Chocolate Chip Banana Bread

IMG_4523

Hello loyal readers! This is Irene's little sis, dropping by for a guest post. As you can imagine, having an incredibly talented sister who forces you to taste-test her mouth-watering creations is a tough job, but someone's gotta do it, right? In all honesty, I have always been amazed by my sister's ability to juggle being not only a lawyer, wife, sister and daughter but also history buff, chef and artist. She continues to inspire me to test my own limits, which of course extends into my most recent venture into the world of cooking! [Ed. note: in the interests of modesty, I wanted to take this part out, but... vanity prevailed :)]

Food Photos1-34

Ok, enough gushing about Irene. Let's talk about what really matters: me...oh wait, I mean...food. As a future doctor and an avid runner, I am very passionate about health, but I also love yummy food. It turns out the two actually go hand in hand! A few weeks ago, I developed an all-consuming, wake-you-up-in-the-middle-of-the-night craving for banana bread, but resisted baking any because a) I was too lazy and b) I was a little worried about my restraint around a batch of freshly baked banana bread (I'm not a saint here people!). Enter my sister! After I confessed my unrelenting craving to Irene over the phone, she immediately invited me over to her house for a baking session, with a twist. Knowing me as well as she does, she suggested that we "healthify" our banana bread by modifying a recipe she found online.

Food Photos1-32
Food Photos1-31

And that is how our delectable, indulgent, guilt-free banana bread recipe was born! While my first impulse was to replace all of the tasty (aka unhealthy) ingredients with their healthier counterparts, my sister gently urged me to consider substituting only half of each ingredient. Having learned through many past experiences that the advice of my older, wiser sister will never steer me wrong, I quickly obliged and followed along with her suggestion. Best.Decision.Ever. If any baked good could solve our economic crisis or fix the health care system, it would be this banana bread. Ok, a little dramatic? Let's just say thoughts of banana bread are no longer waking me up in the middle of the night, but instead are gently lulling me to sleep and keeping me safe and warm at night. Still too dramatic? It's THAT good! I'll let my sister take over with the details because, let's face it, I mainly sat around eating chocolate chips and gossiping as she did the measuring, mixing and cleaning. [Ed. note: hehehe, I so totally made her do the dishes.]

IMG_4603


Chocolate Chip Banana Bread
adapted from http://gourmeted.com/2009/02/21/thesss-nanas-banana-bread/

As you can imagine, the original version of this bread is pretty darn good. Believe it or not, our alterations (less butter, less sugar, whole wheat flour, buttermilk instead of cream) didn't change the taste one little bit, except to make the texture even softer. How can something with so little butter taste so awesome? I have no idea, but it did. We were really good about making the substitutions, too... until, that is, we threw in the giant chocolate chips. :)

2.5 tbsp (34 g) butter
34g unsweetened apple sauce
1/3 cup granulated sugar (or Splenda for baking)
1/4 cup firmly packed light brown sugar
1 large egg
2 egg whites
1 tsp vanilla extract
2 cups mashed, very ripe bananas (about 4 medium bananas)
1 cup unbleached all-purpose flour
3/4 cup whole-wheat flour
1 tsp baking soda
1/2 tsp salt
1/4 tsp baking powder
1/2 cup buttermilk
1/2 cup large bittersweet chocolate chips

Preheat oven to 350F and prepare a 9x5x3 loaf pan.

With a hand mixer, beat the butter in a large bowl with the apple sauce until light and fluffy. Add the sugars and beat well to incorporate. Add the egg, egg whites and vanilla and beat to blend.

Mash the bananas really well and add, beating for 30 seconds on high speed to blend.

Whisk all the dry ingredients together in a separate bowl an add to the banana mixture, alternating with the buttermilk (add half of the dry ingredients, beat just to blend, add buttermilk, beat just to blend, add the rest of the dry ingredients and beat just to blend). Do not overmix. Mix in the chocolate chips.

Pour batter evenly into the prepared pan. Bake until browned on top and a tester inserted into the middle comes out clean, 1 hour to 1 hr and 15 minutes (ours baked slightly longer than that, but start checking at the hour mark).

Cool completely and serve (the banana bread will be too soft to cut into when hot). The original recipe recommends that you give this bread a rest overnight, but I can't tell you if that's a good idea or not - our loaf didn't make it that far.

Continued after the jump...

Thursday, December 3, 2009