Wednesday, February 24, 2010

Spinach Artichoke Dip

Spinach Artichoke Dip

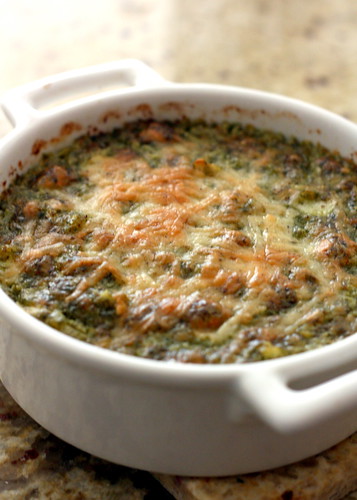
One day, I went looking for a simple spinach artichoke dip recipe, and to my complete amazement, I didn't find one. You'd think that something so ubiquitous would be everywhere, and yet, all the recipes I encountered seemed either unnecessarily complicated or just downright strange. There were recipes with cream cheese and recipes with sour cream. There was even a recipe that used mayo, cream cheese AND sour cream all together. There was another that combined mayo, crème fraîche, Parmesan, Mascarpone and goat cheese. I mean, that's a bit of an overkill for a humble dish that should be a no-brainer, right? Ingredients like onions and breadcrumbs crept into the lists. Red pepper flakes. Jack cheese. Heavy cream. Eh?!

Spinach Artichoke Dip

After half an hour of searching, I was done with all of that. I decided I would just trust my instincts and wing it. Like with my apple pie a while back, I put into the dip just what I thought should be there. Nothing more, nothing less. I don't believe in fancifying food just for the sake of making it "unique." I made half a recipe for a lunch party of 6, just to test the waters, so to speak. That was my only mistake - I should have doubled it. It was the most passed dish on the table, though it was by no means meant to be the star of the appetizer course. Seriously - this dip is straight up and no-nonsense, and I think because of it, it's pretty darn good. Give it a try for your next party and serve it up with sourdough baguette toasts or tangy olive bread - I promise, you're going to love it.

Spinach Artichoke Dip

Spinach Artichoke Dip

1 15-oz can artichoke hearts, drained
1 cup finely chopped sauteed spinach (or 1 cup of chopped frozen spinach, defrosted)
1 cup mayonnaise
1 cup parmesan cheese, grated, plus a pinch for the top
1 clove garlic, finely chopped
a good squeeze of lemon juice
salt and freshly grated pepper, to taste

Preheat the oven to 400F and prepare a baking dish.

Chop the artichoke hearts roughly, but not into too large pieces. Combine half the chopped artichoke hearts, half the Parmesan and all the other ingredients except for the garlic in a food processor and process for a few 5 second pulses until fairly smooth (if you like really smooth dip, use all the ingredients - I like mine with a little bit of texture).

Stir in the rest of the artichoke hearts, the rest of the Parmesan cheese and the chopped garlic. Taste to adjust the seasoning. There shouldn't be any need for more salt, but I like to add pepper for a little bit of a bite. Also add more lemon juice if you like.

Transfer to the baking dish, top with a few pinches of Parmesan, and bake for 20-25 minutes until bubbly and the top is golden. Serve hot, but make sure to save a bite for yourself (cook's privilege!) because this stuff goes quickly.

Continued after the jump...

Sunday, February 21, 2010

Challah

IMG_5999_1

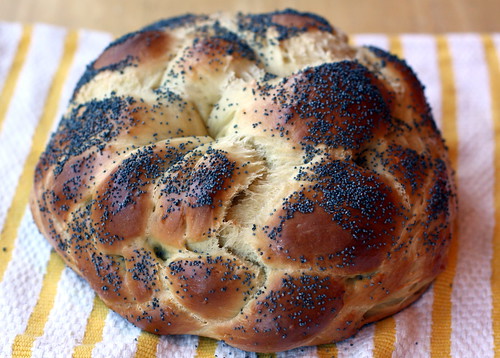
What did I do this Saturday, you might ask? I took two naps and I baked the softest, sweetest, loveliest pull-apart challah I could have ever hoped for. As you can tell, I'm still a complete disaster at braiding it... In the throes of ambition, I tried a six-braided loaf, completely failed at it in the middle and made it a round one to hide the imperfections. Next time, I'll stick with three braids. Even I know my limitations! But the flavor, oh, and the texture - absolute perfection. Soft, warm, slightly sweet, with an eggy crust and crunchy poppy seeds on top... I love this bread, I really love it.

12-06-20

The recipe was recommended to me by the lovely Amy after my disappointment with Peter Reinhard's challah (by the way, I also discovered a later recipe of his that uses EIGHT egg yolks - ha!). It took me a while to try it, but now that I have, there's really no going back. The only tiny little qualm I have is that it's not yellow enough, so I might need an extra egg yolk in there, but it's such an easy and satisfying bread to make, and it looks so beautiful - all pale dimples and burnished gold curves - that I got over the color quickly enough. I have to portion it off to my family as quickly as possible because I can't seem to stop pulling off little sweet pieces to snack on.

Challah
Fine Cooking

2 tsp. instant yeast
16-3/4 oz. (3-1/2 cups) unbleached all-purpose flour; more as needed
1/4 cup warm water
3 large eggs
1/4 cup vegetable oil
1/4 cup honey (1/3 if you want a sweeter challah)
1-1/2 tsp. table salt
For the glaze:
1 egg, lightly beaten
Sesame or poppy seeds for sprinkling (optional)

In a large bowl, mix the yeast with 1/2 cup of the flour. Add the warm water, stir, and let this mixture, called a sponge, sit until it starts to puff up, 15-to 20-minutes. Add the eggs, oil, honey, and salt; stir until well combined. The sponge will remain lumpy—this is fine. Add the remaining flour and mix the dough in the bowl until all the ingredients are combined. Turn the dough out onto a work surface and knead until fairly smooth, about 2 minutes. The dough should feel very firm and will be hard to knead. If it’s soft and sticky, add more flour until it’s very firm [I ended up adding another 1/2 cup]. Transfer the dough to a large, clean container and cover it well. Let it rise until doubled in bulk and very soft to the touch, about 2 hours, depending on the room temperature. Line an insulated baking sheet with parchment or oiled foil. If you don’t have an insulated sheet, stack two sheets together (this keeps the bottom of the bread from overbrowning during baking).

To shape the dough
(see diagram here):

Turn the dough out onto a lightly floured work surface and sprinkle a little more flour over it. Spread and flatten the dough a bit, but don’t worry about punching it down. Cut it into six equal pieces. Set aside the dough pieces, cover them lightly with plastic, and brush all the flour off the work surface. Have a small bowl of water handy. Using no flour, roll a piece of dough with a rolling pin into a very thin sheet, between 1/8 and 1/4 inch thick (don’t worry about making a rectangle; an amoeba-type shape is fine). The dough may stick to the work surface; this is all right—just nudge it gently with a dough scraper. Tightly roll up the sheet like a carpet to form a strand. Roll the strand back and forth between your hands until it’s thin, very even, and 12 to 15 inches long. At the ends of the strand, angle the outer edge of your hands into the work surface as you’re rolling to make the ends pointy and the strand thicker in the middle (This will help you get a football-shaped loaf). The strand needs to grip the work surface slightly during this rolling; the “grab” will help as you roll. If the strand is too slick, very lightly dampen it with water to help it grip the work surface better. Repeat the rolling out, rolling up, and elongating steps with the remaining five pieces of dough, rolling them out to the same length. Lightly sprinkle all the strands with flour to prevent them from sticking to one another during proofing. Arrange the strands parallel to one another. At one end, gather and pinch the strands very tightly together. Weight the end with a heavy canister to keep the braid from moving and to leave your hands free, and braid closely, following the illustrations below. Lightly tap each end of the loaf with your palms to tuck it under the loaf.

Transfer the braid to the lined baking sheet and cover it loosely but thoroughly with plastic wrap. Let proof until doubled in bulk and the loaf remains indented when lightly pressed, about 2 hours, depending on room temperature. (If in doubt, let the dough proof more rather than less.)

To bake:

Position an oven rack in the lower third of the oven and heat the oven to 325°F. Just before baking, brush the dough with the beaten egg. Sprinkle with sesame seeds or poppy seeds, if using. With a thin wooden skewer, poke the bread deeply all over (the holes will prevent air pockets and help the bread keep its shape during baking) [Note: I did not do this and it turned out well]. Bake for 20 minutes. Rotate the challah 180 degrees and bake until the bread is a dark, burnished brown, about another 15 minutes [Note: mine baked for an extra 10 min on top of the 15]. (If the challah is browning too rapidly cover it loosely with foil and let it finish baking. Don’t remove the loaf too soon, as you’ll risk underbaking.) Let cool thoroughly on a rack.

Continued after the jump...

Wednesday, February 17, 2010

Mixed-Berry Muffins and a Blog-a-birthday

IMG_5969


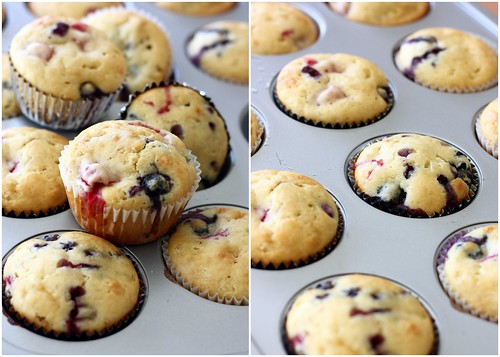
Have you ever noticed that time has a sneaky way of moving forward? Like one day, it's Thanksgiving, and the next day, you wake up and it's the middle of February and your blog has turned two years old? No? Well, that just totally happened to me. And to celebrate, I decided to bake blueberry and raspberry muffins.

12-06-19


I'm not really strict about my breakfast being, well, breakfast. I don't mind a cinnamon bun or a leftover slice of cake with a glass of milk. Sure, I'd like to pretend that I eat healthy granola with skim milk as my first meal of the day, but most of the times, that just doesn't happen, so after a while of it not happening, I just embraced indulging myself a little in the mornings. I hear indulging yourself is the new black this season (and if it isn't... well, it SHOULD be!)

12-06-18


These muffins are a perfect little indulgence. They are delightfully soft, lightly sweet, and I can see them being a breakfast companion as well as taking center stage as mini-muffins for a brunch or a shower party. They are certainly pretty and festive, perfect slightly warm and with a tall glass of milk, and they make me smile in the mornings. Next week - next week I'll go back to yogurts and granolas and fruit - but for now, during my blog-a-birthday week, I can't think of a better way to start my day than a warm little nugget of cake studded with sweet berries and aromatic with vanilla.

12-06-092


Mixed-Berry Muffins
adapted from the Magnolia Bakery Cookbook
makes 12-16 muffins

2 1/2 cups all purpose flour
3/4 cup sugar
1 1/2 tablespoons baking powder
3/4 teaspoon salt
2 large eggs, lightly beaten
1 1/2 cups buttermilk (or whole milk)
6 tablespoons unsalted butter, melted and cooled
1 1/2 teaspoons vanilla extract
1 1/2 cups mixed berries (I used blueberries and raspberries)

Preheat oven to 350F and prepare 12-16 muffin cups.

Combine all the dry ingredients in a large bowl and whisk together. Make a well in the center and stir in the wet ingredients until just combined (do not overmix). The batter will be lumpy, but that's ok.

Toss the berries with a little bit of flour, just to coat, and gently fold into the batter. Divide between the muffin cups and bake for 20-30 minutes, until the tops are very lightly golden and a cake tester inserted in the middle comes out with moist crumbs attached. Do not overbake

Continued after the jump...
Sunday, February 14, 2010

Madeira Chicken with Mushrooms

Madeira Chicken with Mushrooms

Our Valentine's Days have always been fraught with disaster. The first one was great, but after that, it was like a curse descended onto our V-Day plans. One year, our reservations got lost. Another year, the restaurant had a fire in their kitchen and had to close down. There was a time that our car got a flat on the way to our destination, and I think by the fourth year of this, we just gave up on plans. We got the hint.

Madeira Chicken with Mushrooms

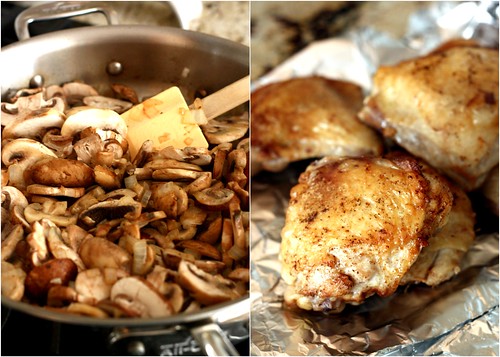
This year, I'm giving my Valentine some chicken. Because chocolates are nice, but let's get real, I know my husband is a meat and potatoes kind of guy and a really good dinner always excites him much more than dessert. It sounds unromantic, I know, but you haven't tasted this chicken. It has an amazing flavor. It has mushrooms, it has onions, it has thyme, and it gets to braise in a magical mix of butter, Madeira and Worcestershire sauce until meltingly tender and fragrant with butter, wine and herbs. The skin gets re-crisped under the broiler, and when you cut into it, you'll want to have lots of crusty country bread on hand to sop up the dark, rich sauce, which might just be my favorite part. Oh, and it comes together with about 15 minutes of work and half an hour of braising, during which you and your Valentine can... well, I'll let you figure that part out. I'm just here for the food.

Madeira Chicken with Mushrooms


Madeira Chicken with Mushrooms
adapted from Williams-Sonoma
serves 6

6 chicken thighs, fat cut off
Salt and freshly ground pepper, to taste
3 Tbs. unsalted butter
1 medium yellow onion, chopped
1 lb. wild and/or cultivated mushrooms, sliced
1/2 cup Madeira or dry sherry
1 1/2 Tbs. Worcestershire sauce
1 1/2 Tbs. chopped fresh thyme

Season the chicken generously on both sides with salt and pepper. In a large fry pan or saute pan with a lid, melt the butter on med-high heat and brown the chicken on both sides, about 4 minutes per side. Transfer the chicken to a plate and set aside.

Add the onion into the pan juices and saute until barely softened, about 3 minutes. Add the mushrooms and saute until the juices are released, about 5 minutes. Stir in the Madeira and Worcestershire sauce.

Return the chicken to the pan, nestle it in between the mushrooms and onions, cover and braise on medium-low heat until cooked throughout, 20-25 minutes. About five minutes before the chicken is done, pre-heat the oven to broil. Once the chicken is done, put the pan into the oven, uncovered, for 5 minutes to re-crisp the skin. Adjust the seasoning in the sauce, stir in chopped thyme and serve immediately over rice or mashed potatoes with lots of bread to sop up the sauce.

Continued after the jump...