Monday, January 19, 2009

Vanilla bean creme brulee topped with blueberries and vanilla sugar

I can't believe that over a year has passed since I started this blog (!!) and I've still never told you about my favorite dessert. It also happens to be one of the easiest desserts to make for a 4-8 people dinner party (coincidence? I don't think so). Creme brulee is not fussy or complicated, but it's elegant and smooth like George Clooney in a tux, has depths of flavor, a crackly sugar crust and is infinitely adaptable (I've infused it with edible lavender or pieces of banana, just to name a few ways). And people, I'm all about things you can prepare 24 hrs in advance and finish off with a blowtorch.


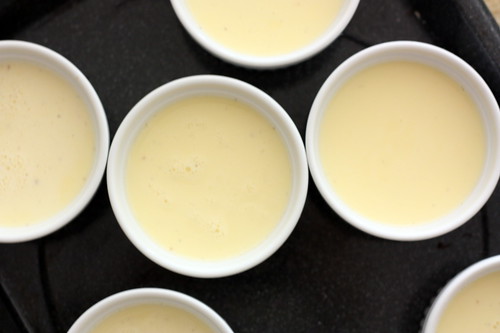
So if this dessert is so amazing, you say, how come Irene has never peeped a word about it on this blog? Well... You see... I've been saving it for you, so to speak, until I could make it at the height of perfection -- and we all know that this means a real vanilla bean. Sure, I've made this with vanilla extract at least 10 times and it's always been phenomenal, but using a real vanilla bean just elevates it in ways that you can't really describe until you inhale the elusive scent of this pod of the vanilla orchid and just know that there is something different here, something special. Fresh blueberries and a sprinkle of vanilla sugar give this dessert an extra decadence, as if it needed any.


There are only two secrets to a successful creme brulee, and they are, well, not rocket science. (1) Don't curdle the egg yolks, and (2) bake the custard in a water bath. However much you are tempted to rush these steps, don't, because the smooth, silky creaminess at the end will all be worth it.


Creme Brulee
(recipe from a Williams & Sonoma cookbook - serves 4)

2 cups (16 oz) heavy cream
4 egg yolks
pinch of salt
1/4 cup plus 4 tbsp of sugar
1/2 vanilla bean (or 1 tsp of vanilla extract)
optional for topping: about 1/4 cup of blueberries, 1 tbsp vanilla sugar

Preheat an oven to 300°F. Have a pot of boiling water ready. Line a baking pan that is 2 to 3 inches deep with a small kitchen towel (I've skipped lining the pan with a towel lately and it didn't seem to affect the finished product).

Using a paring knife, split the vanilla bean lengthwise down the middle and scrape the seeds from 1/2 of the bean into a 2-quart saucepan. Add the cream, stir to mix and set the pan over medium-low heat. Warm the cream until bubbles form around the edges of the pan and steam begins to rise from the surface. Remove from the heat and set aside to steep, about 15 minutes. (Note 1: If using vanilla extract, warm the cream as directed without the vanilla bean - you can use the cream right away without steeping) (Note 2: if using a vanilla bean: at this point, store the half of the bean that you didn't use and submerge the empty half in a cup of sugar for a few weeks to get vanilla sugar).

In a large bowl, whisk together the egg yolks, salt and the 1/4 cup sugar (and vanilla extract, if using) until smooth and blended. Drizzle about 1/4 cup of the warm cream into the egg yolks to temper them (so that the yolks don't curdle), whisking all the while, then gradually add the rest of the cream, whisking until blended. Pour the custard through a fine-mesh sieve set over a bowl. Divide the custard among four 5- or 6-oz. ramekins and place the ramekins in the prepared baking pan. Add boiling water to fill the pan halfway up the sides of the ramekins. Cover the pan loosely with aluminum foil and bake until the custard is set around the edges and jiggles only a little bit in the middle, 35-40 min (note: this has taken me anywhere from 40 - 60 minutes, so check every 5 minutes after the 35 minute mark).

Transfer the ramekins to a wire rack and let cool to room temperature. Cover with plastic wrap and refrigerate for at least 4 hours or up to 3 days.

Just before serving, sprinkle 1 Tbs. of the sugar evenly over each custard. Using a kitchen torch, melt the sugar according to the manufacturer's instructions. Serve immediately.

(Note 3: To top, toss 1/4 cup of blueberries in about a tablespoon of vanilla sugar and divide among the 4 ramekins. Even if you've just submerged your vanilla bean when you started making the custard, your sugar will already smell like vanilla and you can use it. However, leave the rest of the sugar to infuse for 2 weeks to get the amazingness that is real vanilla sugar).

Continued after the jump...

Saturday, January 17, 2009

Cream Puffs

When I was growing up, my parents taught me to share. Sure, I didn't see the wisdom of it then - after all, my favorite dolls were, by definition, mine, but I grudgingly accepted their lordship over me, all the while muttering stubbornly that "when I grow up," I won't stand for any of this sharing nonsense. Well, I did eventually grow up, and as you can all guess, I realized that my parents were right about oh, so many things, but also about sharing (and now I mutter, "they always had to be right, didn't they...").

Living in the big city, however, I'm learning that sharing is just not the thing here amongst the "in" crowd. Apparently, people do not share, among other things: recipes, telephone numbers of their maids, hair salons, favorite restaurants, car dealerships, projects they are working on, the place they buy their All Clads on sale and, last but not least, their husbands (just kidding, I don't share mine either, but I just wanted to see if you were paying attention!). I guess I have to resign myself to not being part of the "in" crowd because, really, it all makes no sense to me (except the bit about husbands - I wasn't kidding, I don't share A., don't even think about it ;) ).

The recipe for these cream puffs comes from my friend Amy, who generously did not mind sharing it not only with me, but with all of you as well. It was my first time making cream puffs and I was worried about many things (will they puff? how will I know when the dough is ready? can I really beat the eggs in *by hand*?). Even if you've never made them before, just trust me - when each step is supposed to be complete, you will *know.* These little puffs are very easy to make, and very, very good! I filled them with Dorie's pastry cream and mmmmmmm...... they were gone before I even had a chance to serve the tea (good thing I'm sneaky and hid one for myself before the guests arrived).

And, since I talk about my grandmother so much here, and since she makes the best cream puffs in the world (but won't give anyone the recipe, lol), let me post a recent picture of us together. Enjoy the cream puffs!


Cream Puffs
(via my friend Amy, via Fine Cooking)

Pastry Recipe:
1/2 cup water
2 oz. (4 Tbs.) unsalted butter, cut into pieces
1 Tbs. sugar
Pinch salt
2-1/4 oz. (1/2 cup) all-purpose flour
2 large eggs, at room temperature

For the egg wash:
1 large egg yolk, at room temperature
1 tsp. milk

Position a rack in the center of the oven and heat the oven to 400°F. Line a baking sheet with kitchen parchment. In a small saucepan, combine the water, butter, sugar and salt. Bring to a boil over medium-high heat. Add the flour and stir vigorously with a wooden spoon until smooth without any lumps and the batter pulls away from the sides of the pan. Remove from the heat and beat with a wooden spoon just until the steam stops rising, about 1 minute.

Add one egg and beat well with the wooden spoon. The batter will seem to break apart, but keep working until it becomes smooth. Add the second egg and beat again until the mixture is completely smooth.

Scoop the batter into a pastry bag fitted with a 1/2-inch plain pastry tube (Ateco #5). Hold the bag about 1 inch above a parchment-lined baking sheets and pipe out mounds about 1 inch in diameter (Irene's note: I made two sizes - 1 inch and 2 inch). Beat the egg yolk with the milk to make an egg wash. Lightly brush the egg wash on top of each puff with a pastry brush, tapping down any points of dough. (Amy's note: I have used two spoons and dropped them on to a cookie sheet, but a pastry bag makes them turn out a little more uniform. Also, you can use a broad star to give them even more shape)

Bake until the pastries are puffed and deep golden, 22 to 24 min. (Irene's note: after mine were done, I turned off the oven, propped the door open with a wooden spoon and let them dry out for another 10-15 min). Let cool on a wire rack. If not using the same day, transfer to a plastic bag and freeze for up to four months; thaw in the refrigerator overnight before using.

From Fine Cooking 49, pp. 72

(Irene's note: After the puffs cooled, I then used my smallest plain tip to fill them with Dorie's pastry cream - yum! I think I was a little over-enthusiastic and filled them all the way up, which resulted in the tops getting a little soft from the cream. Next time, I will fill them only half way.)

Dorie Greenspan's Pastry Cream
2 cups whole milk
6 large egg yolks (I'm going to use a few less next time to cut some calories)
1/2 cups sugar
1/3 cup cornstarch, sifted
1 1/2 teaspoons pure vanilla extract
3 1/2 tablespoons unsalted butter, cut into bits at room temperature

Bring the milk to a boil in a small saucepan.

Meanwhile, in a medium heavy-bottomed saucepan, whisk the egg yolks together with the sugar and cornstarch until thick and well blended. Still whisking, drizzle in about 1/4 cup of the hot milk– this will temper, or warm, the yolks so they won’t curdle. Whisking all the while, slowly pour in the remainder of the milk. Put the pan over medium heat and, whisking vigorously, constantly and thoroughly (making sure to get the edges of the pot), bring the mixture to a boil. Keep at a boil, still whisking, for 1 to 2 minutes, then remove the pan from the heat.

Whisk in the vanilla extract. Let sit for 5 minutes, then whisk in the bits of butter, stirring until they are full incorporated and the pastry cream is smooth and silky. Scrape the cream into a bowl. You can press a piece of plastic wrap against the surface of the cream to create an airtight seal and refrigerate the pastry cream until cold or, if you want to cool it quickly–as I always do–put the bowl into a larger bowl filled with ice cubes and cold water, and stir the pastry cream occasionally until it is thoroughly chilled, about 20 minutes.

Chocolate Sauce
3 oz. bittersweet chocolate, finely chopped
1 oz. milk chocolate, finely chopped
1/2 cup heavy cream

In a metal bowl set over a saucepan of simmering water, melt the bittersweet and milk chocolate, stirring with a rubber spatula until the chocolate is completely melted. In a small saucepan, heat the cream over medium to just below the boiling point. Remove the bowl of chocolate from the pan of water and wipe the bottom and sides dry. Pour the hot cream into the melted chocolate and stir with the spatula until the sauce is cool, about 4 min. The sauce can be made up to two weeks ahead and stored in the refrigerator; before serving, warm the sauce in a metal bowl set over a pan of simmering water.

From Fine Cooking 49, pp. 73

Continued after the jump...

Saturday, January 3, 2009

Cabbage Rolls

Last time I posted about cabbage rolls, it seems to have messed up the blog when viewed in IE, so let's try it again, hoping that technology will cooperate with me. Cabbage rolls is the quintessential Easter European/Russian/Jewish type of dish that, if you've never had it before, sounds kind of strange (cabbage? wrapped around meat and rice? weird...), but once you've tasted it, there's no going back. The silky tenderness of the cabbage wrapped around a succulent mixture of meat, rice, onions and spices and sauteed in tomatoes and more onions until the flavors dance and then topped with cool, tangy sour cream... It's a winner from all angles, especially on a cold, rainy night. To convince you further, I can add that the Greeks have something very similar called Dolmathes (grape leaves stuffed with meat and rice), and if the Greeks do anything right (and oh, they sure do), it's definitely food.


Cabbage Rolls (or Golubtsi, if you want to sparkle with your knowledge of Russian dishes)
recipe via my aunt

For the filling

1 head of cabbage
1.5 lb of ground meat (the best, as my aunt tells it is 1 lb beef and .5 lb of pork, but I used 1.5 lb of lean turkey and it was still pretty great)
1 cup cooked rice
1 onion
1 large carrot
2 T chopped parsley
1 egg
2 slices of stale bread
salt and pepper

For the broth
1 can chopped tomatoes, drained (or a few small tomatoes, chopped and seeds removed)
1 T tomato paste
2/3 cups water or chicken broth
1 onion
1 large carrot
2 T chopped parsley
salt and pepper
1 teaspoon dried thyme or oregano

sour cream for garnish and bread for soaking up the broth (this is the really important part, people, don't skip it)

Bring water to a boil in a medium-large, heavy bottomed pot (ideally, it should be a cast iron pot, but I don't have one and it all worked out well anyway). Separate as many large and medium leaves from the cabbage as you can by cutting around the stem and removing the leaves. It's ok if they rip a little. Submerge the leaves in boiling water and cook for 7-10 minutes or until soft. Drain water and take out the leaves.

Grate 1 onion and 1 carrot on a fine grater and chop the parsley. Cut the crust off of the bread slices and soak in a little bit of water until very soft. Squeeze out the water. Combine the ground meat, grated vegetables, parsley, egg, rice and bread and mix very well so that all the ingredients are distributed properly. My aunt does this with her hands, but I find that a large fork works for me. Season the mixture with salt and pepper and set aside.

Chop the other onion and grate the carrot on a large grater and saute in a skillet for a few minutes with a little olive oil until the carrot is soft and the onion is translucent. Add the 2/3 cup of water or chicken broth and tomato paste and stir. Then add the chopped tomatoes, parsley, thyme or oregano and season to your liking.

Pour half the mixture into the heavy bottomed pot and reserve the other half.

Now, wrap your cabbage rolls. Take one leaf of cabbage -- it should be soft enough to bend, but if the stem is a little tough still, use a meat tenderizer to help even it out. Grab a handful of the meat mixture and set it at the base of the leaf. Fold forward once, then fold both of the sides into the middle (like an envelope) and fold again. You can cut off the remainder of the leaf or just continue folding. Arrange the cabbage rolls in the pot so they fit snugly next to each other. You should have about 12-14 pieces.
Pour the rest of the broth on top. Cover and simmer on medium-low heat for 45 min to an hour or until the meat is fully cooked and the cabbage rolls take on a darker, golden hue from the tomatoes and the carrots. Garnish with sour cream and serve with dark bread. Excuse me while I go eat the last two before A. gets to them.

Continued after the jump...