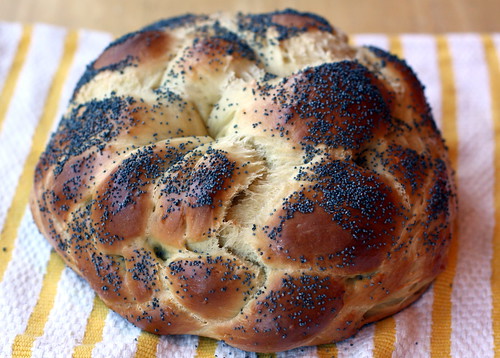
What did I do this Saturday, you might ask? I took two naps and I baked the softest, sweetest, loveliest pull-apart challah I could have ever hoped for. As you can tell, I'm still a complete disaster at braiding it... In the throes of ambition, I tried a six-braided loaf, completely failed at it in the middle and made it a round one to hide the imperfections. Next time, I'll stick with three braids. Even I know my limitations! But the flavor, oh, and the texture - absolute perfection. Soft, warm, slightly sweet, with an eggy crust and crunchy poppy seeds on top... I love this bread, I really love it.
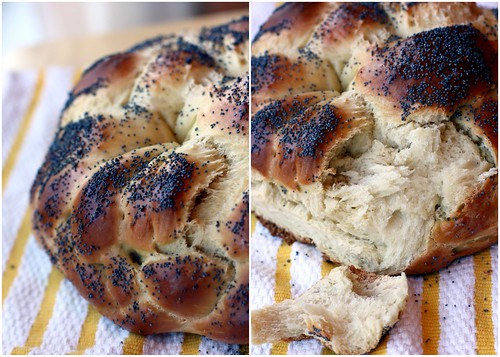
The recipe was recommended to me by the lovely Amy after my disappointment with Peter Reinhard's challah (by the way, I also discovered a later recipe of his that uses EIGHT egg yolks - ha!). It took me a while to try it, but now that I have, there's really no going back. The only tiny little qualm I have is that it's not yellow enough, so I might need an extra egg yolk in there, but it's such an easy and satisfying bread to make, and it looks so beautiful - all pale dimples and burnished gold curves - that I got over the color quickly enough. I have to portion it off to my family as quickly as possible because I can't seem to stop pulling off little sweet pieces to snack on.
The recipe was recommended to me by the lovely Amy after my disappointment with Peter Reinhard's challah (by the way, I also discovered a later recipe of his that uses EIGHT egg yolks - ha!). It took me a while to try it, but now that I have, there's really no going back. The only tiny little qualm I have is that it's not yellow enough, so I might need an extra egg yolk in there, but it's such an easy and satisfying bread to make, and it looks so beautiful - all pale dimples and burnished gold curves - that I got over the color quickly enough. I have to portion it off to my family as quickly as possible because I can't seem to stop pulling off little sweet pieces to snack on.
Challah
Fine Cooking
2 tsp. instant yeast
16-3/4 oz. (3-1/2 cups) unbleached all-purpose flour; more as needed
1/4 cup warm water
3 large eggs
1/4 cup vegetable oil
1/4 cup honey (1/3 if you want a sweeter challah)
1-1/2 tsp. table salt
For the glaze:
1 egg, lightly beaten
Sesame or poppy seeds for sprinkling (optional)
In a large bowl, mix the yeast with 1/2 cup of the flour. Add the warm water, stir, and let this mixture, called a sponge, sit until it starts to puff up, 15-to 20-minutes. Add the eggs, oil, honey, and salt; stir until well combined. The sponge will remain lumpy—this is fine. Add the remaining flour and mix the dough in the bowl until all the ingredients are combined. Turn the dough out onto a work surface and knead until fairly smooth, about 2 minutes. The dough should feel very firm and will be hard to knead. If it’s soft and sticky, add more flour until it’s very firm [I ended up adding another 1/2 cup]. Transfer the dough to a large, clean container and cover it well. Let it rise until doubled in bulk and very soft to the touch, about 2 hours, depending on the room temperature. Line an insulated baking sheet with parchment or oiled foil. If you don’t have an insulated sheet, stack two sheets together (this keeps the bottom of the bread from overbrowning during baking).
To shape the dough (see diagram here):
Turn the dough out onto a lightly floured work surface and sprinkle a little more flour over it. Spread and flatten the dough a bit, but don’t worry about punching it down. Cut it into six equal pieces. Set aside the dough pieces, cover them lightly with plastic, and brush all the flour off the work surface. Have a small bowl of water handy. Using no flour, roll a piece of dough with a rolling pin into a very thin sheet, between 1/8 and 1/4 inch thick (don’t worry about making a rectangle; an amoeba-type shape is fine). The dough may stick to the work surface; this is all right—just nudge it gently with a dough scraper. Tightly roll up the sheet like a carpet to form a strand. Roll the strand back and forth between your hands until it’s thin, very even, and 12 to 15 inches long. At the ends of the strand, angle the outer edge of your hands into the work surface as you’re rolling to make the ends pointy and the strand thicker in the middle (This will help you get a football-shaped loaf). The strand needs to grip the work surface slightly during this rolling; the “grab” will help as you roll. If the strand is too slick, very lightly dampen it with water to help it grip the work surface better. Repeat the rolling out, rolling up, and elongating steps with the remaining five pieces of dough, rolling them out to the same length. Lightly sprinkle all the strands with flour to prevent them from sticking to one another during proofing. Arrange the strands parallel to one another. At one end, gather and pinch the strands very tightly together. Weight the end with a heavy canister to keep the braid from moving and to leave your hands free, and braid closely, following the illustrations below. Lightly tap each end of the loaf with your palms to tuck it under the loaf.
Transfer the braid to the lined baking sheet and cover it loosely but thoroughly with plastic wrap. Let proof until doubled in bulk and the loaf remains indented when lightly pressed, about 2 hours, depending on room temperature. (If in doubt, let the dough proof more rather than less.)
To bake:
Position an oven rack in the lower third of the oven and heat the oven to 325°F. Just before baking, brush the dough with the beaten egg. Sprinkle with sesame seeds or poppy seeds, if using. With a thin wooden skewer, poke the bread deeply all over (the holes will prevent air pockets and help the bread keep its shape during baking) [Note: I did not do this and it turned out well]. Bake for 20 minutes. Rotate the challah 180 degrees and bake until the bread is a dark, burnished brown, about another 15 minutes [Note: mine baked for an extra 10 min on top of the 15]. (If the challah is browning too rapidly cover it loosely with foil and let it finish baking. Don’t remove the loaf too soon, as you’ll risk underbaking.) Let cool thoroughly on a rack.


25 comments:
oh this looks simply divine :)
A little nap during the day is suppose to be healthy. It makes you feel fresh and energetic, so I heard.
The most pretty challah, love making this on Friday, but Saturday sounds more like fun baking it.
That's a beautiful bread! I love making challah - the perfect weekend bread. Mind you, the braiding usually gets the better of me too!
Yay! I'm still looking for a good challah recipe... thanks for posting this!
This challah bread looks delish!! It also happens to be my favorite!!
Oh challah....it is a very yummy bread. Great idea on the round shape! Try a chocolate challah it is awesome :)(I have a recipe on my blog)
Ooh! Now, I gotta try *that*!
Wow that is really beautiful, love the way you have shaped it.
Your braiding looks fine to me!
Homemade challah is the best! And I love that you made yours round. Thanks for a lovely blog!
This is one gorgeous loaf of bread!
That looks quite perfect, Irene - I need to get off me butt and make perfect bread too! :)
Mmmm... homemade Challah! I'm so going to be making this. I've never attempted a Challah before and I think it's about time.
Looks lovely!
Irene, this is GORGEOUS! :-) Who cares if it's not perfect, I think that makes it even more special. :-) Well done!
okay, i made it! you were right, it is pretty damn close to perfect! i added the extra honey and an extra egg yolk (the yolk didn't do too much to the color tho).
i didn't add the ingredients in the right order (oops!) so i ended up with these little tiny like, goosebumps, all over the dough. it made my crust a little crusty, but the inside was heavenly. i'm sure when i add the ingredients in the right order my crust will be better.
i suck at six strand braiding too. i'm doing a three strander next time. do you think the six strands is what helps give it that pull apart texture at all?
Hmm... noted about the extra egg yolk. Maybe it takes many more to make it really eggy. I'm no expert at bread baking, so only guessing here. I don't think the braiding has too much to do with the texture, but rather the fact that this is what's called enriched dough. I baked another enriched bread last year and did not braid it at all (sweet Jewish yeast bread) and it had the same pull-apart texture. However, I would hesitate to use that recipe for challah because instead of being enriched with oil, that one is enriched with butter and milk, so it isn't pareve. I'm glad you liked the flavor - I really enjoyed it!
Oh, and I read somewhere a suggestion to use food coloring to make the challah yellow - food coloring!!! No way!
This is a yellow possibility:
replace the eggs with only egg yolks so that you get the same liquid amount as the 3 regular eggs.
according to cook's thesaurus... One egg contains about one tablespoon of egg yolk and two tablespoons of egg white.
So that's three tbs of liquid per egg, so approximately 3 egg yolks per egg required for the recipe, at 9 egg yolks. You could try something like, 1 egg, and 6 egg yolks.
My only concern with this is I tend to shy away from recipes that don't use the full egg because I find it wasteful. At the moment, I have someone who will eat an egg white omelet around, but I don't like eggs unto themselves.
Same here :)
I hate separating eggs and having to "find" ways to use egg whites or leftover yolks. Since I love the flavor and texture of this challah, I will just stick to the amount of eggs specified in the recipe. However, I'm not averse to trying out other recipes, so you never know!
Well, well, well... I see you have poppy seed to decorate the challah. C'mon, girl, give us the full throttle poppy seed Hamentaschen recipe. :)
Btw, I drooled all over the keyboard looking at your creation.
Ehehe, I was just getting to that...
Oh, I have a how to braid 6 braided challah I can send you. I still can't quite figure it out. I just found your blog, and I love it. Made the Tarte aux Fraise with fresh strawberries from the farmers market. Custard turned out perfect.
OH, yes please! I had some sort of a chart... but clearly it didn't do any good. :)
OH MY! This looks SO lovely! So professional! Bravo. If I can master the diagram on how to braid it I might give it a go this weekend. Thanks for the inspiration!
FWIW, The only Reinhart Challah recipe I have is in the "Artisan Breads Everyday" book. It calls for "8-10" yolks (yes, yolks only), but each ingredient is listed by volume AND mass. If possible, weigh all the ingredients. When I weighed the ingredients, in order to the the mass of egg yolk called for, I actually used 11 yolks.
I encourage those with scales and recipes that provide the mass of the ingredients, to *always* weigh.
Post a Comment