Friday, April 23, 2010
Cornbread
I have a small confession to make. *Deep breath* I don't really like traditional Texan cornbread. You know, the kind that's made entirely with cornmeal and has like one teaspoon of sugar, if that? The kind made in a cast iron pan with a healthy slather of bacon grease? Yeah, that kind. It turns out that I'm a California girl to the tips of my toes and I need the sweet cushioning of flour and sugar, and the thought of bacon grease scares me more than just a little. Look, we all have our faults, ok? Count this as one of mine. You still love me, right?
If you're like me, this cornbread is the recipe for you. It's soft, moist and yet sturdy enough to cut into squares - though I do advise you to make those squares larger rather than smaller; it's just "corny" enough, especially with the addition of sweet corn kernels; and its sweetness is there, but just hanging out in the background, making this cornbread a perfect vehicle to sweep up some tangy sauce at a summer BBQ.
Last but not least, this recipe's beguiling simplicity (a five minute mixing effort with a wooden spoon) creates a platform for ideas to run free. If you're a real Texan, you might want to turn away now, because I know this will hurt you. I dreamed of adding roasted and chopped poblano peppers to the batter, of spicing it up with jalapenos or throwing in little delicious salty nuggets of pancetta, and maybe, just maybe swirling in some softened goat cheese. I don't know what ideas I will come up with for a second rendition of this cornbread - all I know is that I'm making a double batch and not looking back.
Cathy Justice's Best of Show Blue Ribbon Cornbread
via Dorie Greenspan
1 cup yellow cornmeal
1 cup all-purpose flour
1/4 cup granulated sugar
1 teaspoon baking powder
1/2 teaspoon baking soda
1/16 teaspoon salt (I used 1/2 tsp.)
1 cup buttermilk
1 egg, slightly beaten
3/4 cup canola oil
1 cup sweet corn kernels
Heat oven to 425F and prepare an 8x8 baking pan.
In a large bowl, whisk together all the dry ingredients. In a smaller bowl (I used a measuring cup), whisk together all the wet ingredients until smooth. Pour over the dry ingredients and mix with a wooden spoon or a spatula only until the dry ingredients are moistened. Batter will be lumpy, but that's ok. Gently stir in corn kernels.
Pour out into the baking pan and bake for 30 minutes, until the top is golden brown and a toothpick inserted into the center comes out clean. Continued after the jump...
Posted by
Irene
at
8:30 PM
10
comments
Labels: Appetizers and Side Dishes, Quickbreads
Wednesday, February 24, 2010
Spinach Artichoke Dip
After half an hour of searching, I was done with all of that. I decided I would just trust my instincts and wing it. Like with my apple pie a while back, I put into the dip just what I thought should be there. Nothing more, nothing less. I don't believe in fancifying food just for the sake of making it "unique." I made half a recipe for a lunch party of 6, just to test the waters, so to speak. That was my only mistake - I should have doubled it. It was the most passed dish on the table, though it was by no means meant to be the star of the appetizer course. Seriously - this dip is straight up and no-nonsense, and I think because of it, it's pretty darn good. Give it a try for your next party and serve it up with sourdough baguette toasts or tangy olive bread - I promise, you're going to love it.
Spinach Artichoke Dip
1 15-oz can artichoke hearts, drained
1 cup finely chopped sauteed spinach (or 1 cup of chopped frozen spinach, defrosted)
1 cup mayonnaise
1 cup parmesan cheese, grated, plus a pinch for the top
1 clove garlic, finely chopped
a good squeeze of lemon juice
salt and freshly grated pepper, to taste
Preheat the oven to 400F and prepare a baking dish.
Chop the artichoke hearts roughly, but not into too large pieces. Combine half the chopped artichoke hearts, half the Parmesan and all the other ingredients except for the garlic in a food processor and process for a few 5 second pulses until fairly smooth (if you like really smooth dip, use all the ingredients - I like mine with a little bit of texture).
Stir in the rest of the artichoke hearts, the rest of the Parmesan cheese and the chopped garlic. Taste to adjust the seasoning. There shouldn't be any need for more salt, but I like to add pepper for a little bit of a bite. Also add more lemon juice if you like.
Transfer to the baking dish, top with a few pinches of Parmesan, and bake for 20-25 minutes until bubbly and the top is golden. Serve hot, but make sure to save a bite for yourself (cook's privilege!) because this stuff goes quickly.
Continued after the jump...
Posted by
Irene
at
10:00 PM
18
comments
Labels: Appetizers and Side Dishes
Friday, January 1, 2010
Baked Brie
This year, A. and I decided to do something unprecedented - we decided to stay home and throw ourselves a party. There was a menu, there were fancy clothes, there was an entire bottle of champagne, there were twinkle lights and presents and a whole lot of tipsiness... in other words, it was a totally awesome way to start the new year!
My dears - in this new year, I want to wish you all much health, happiness, luck, peace, love and prosperity. May our knives always be sharp and may our cuts heal quickly. Happy 2010!
Baked Brie
1 sheet of puff pastry, defrosted if frozen
1 standard sized triangle of brie
a little olive oil, for brushing
This is a ridiculously easy thing to make, and yet, this gets me the most accolades when I do make it. You take one sheet of defrosted puff pastry (I prefer to use all-butter puff pastry), you wrap it around a good-sized triangle of brie, you brush it with a little olive oil and you bake it at 425F for about 15-20 minutes, until the pastry is flaky and golden and the cheese is all melty and ooozy goodness. Ta-daa!
You can totally dress this up by cutting the cheese in half and layering it with a bit of brown sugar, raisins and sauteed apples. I mean, it couldn't hurt, right? But the beautiful thing is that you can serve it just simple-like - beautifully puffed pastry and a molten lava of cheese. It's the kind of marriage that needs no embellishments.
Continued after the jump...
Posted by
Irene
at
8:14 PM
16
comments
Labels: Appetizers and Side Dishes
Wednesday, August 12, 2009
Summer Sundried Tomato Pesto
I have a question for all of you who have your own blogs - how do you feel about other people using your material? I get many requests to use my photos or recipes on other people's blogs, and usually, I'm pretty ok with that as long as I'm asked and as long as there is proper attribution. But recently, I found a website that reposted a copy of my feed from Google Reader IN FULL. They did link to Confessions of a Tart and attributed the content to me, but still, they had reposted everything, from all of my posts. This website apparently has no original content - all they do is publish other people's material. And, to make matters worse, they had ads all over the website, so they are also profiting from other people's creativity.
I got very, very angry. In fact, I think I had to take a few deep breaths to calm down before I did anything. Granted, I don't consider this blog a work of art or whatever, but it's my little corner of the world, my baby, even if I open it up for everyone to see. It's my words and my photos and sometimes, even my own recipes. It's something so very personal to me, and, having now been blogging for a year and a half, it's something that I'm pretty proud of.
I wrote an email to the website from my personal email address and asked them nicely to take down my content. They agreed. Two months later, they still kept posting the full feeds from my blog. Grr. I took it to the next level and wrote them a more detailed and much less nice email from my business account - you know, the one that says in small but scary letters that I'm an Esq. and that I'm not afraid to kick some ass (in legal terms) should I feel the need to do so. After that, they finally complied with my request and removed my content.
I guess this is going to happen (and I've already had to deal with this several times, so not the first and not the last), but what made me really sad was that I had to bring out the big guns for someone to do the right thing. Why did I have to take my time away from family, friends, work and this blog to write a two-page email, citing relevant law and threatening legal action, for someone to stop stealing my work for their own profit? I'm 30 years old, but the ways of the world still disappoint me sometimes.
Meanwhile, I made you pesto. Delicious, delicious pesto. I made it by hand, and I cannot even tell you how much better it is that the food processor version. I mean, worlds, WORLDS apart. Universes, even! That's how good it was. No, really, that's how good it was. In fact, I think it was the best pesto I've ever had, so go and make this while basil is still fragrant and garlic is fresh and pink and you can sit on the patio with a glass of very crisp, very cold white wine and dip your bread into this explosion of bright green flavors and just focus on the beautiful things in life.
Summer Sundried Tomato Pesto
(serves 4 for dipping or mixing into pasta)
2 bunches basil
1 bunch parsley
2 cloves garlic
1/4 cup shredded parmesan cheese
1/4 cup sundried tomatoes
scant 1/4 cup pine nuts, toasted
1/4 - 1/2 cup olive oil (depending on how thick you want the pesto to be)
salt & pepper
There are two ways to make this - with a knife or with a mortar & pestle. Either way, crushing the basil and parsley is important because it really brings out the full flavor of the greens.
If using a mortar & pestle: Crush the garlic with about 1/4 tsp of salt and throw it into a large bowl. Then, very roughly chop the basil and parsley (some people use parsley stems, but I take them out) and crush, first the basil and then the parsley, rubbing the pestle against the sides of the mortar to bring out the flavor. You will know when you're doing well because the greens will look dark and bruised and the smell will be incredible. Sometimes, a small drizzle of olive oil helps get the process going. Add to the garlic in the big bowl.
Toast and crush the pine nuts and then chop the sundried tomatoes finely. Note: if using dry sundried tomatoes (as opposed to packed in oil), soak them in hot water for about 5 minutes first to make them nice and plump. Add to the bowl, throw in the parmesan, and mix with a fork, adding the olive oil in a thin, steady stream until you have achieved the desired consistency. Add salt and pepper to taste.
If not using a mortar & pestle: Roughly chop the garlic cloves. Sprinkle with about 1/4 tsp of salt and then crush with the back of a large knife until you have a paste. Throw the garlic past into a large bowl. Chop the basil and parsley finely. Then, put the chopped greens into a ziploc bag and gently hit them with the back of a large knife or the flatter side of a meat tenderizer until the greens darken in color and look bruised. I would do this one at a time (once for basil and once for parsley). Add to the large bowl with the garlic.
Toast and chop finely the pine nuts, then chop finely the sundried tomatoes. Note: if using dry sundried tomatoes (as opposed to packed in oil), soak them in hot water for about 5 minutes first to make them nice and plump. Add to the bowl, throw in the parmesan, and mix with a fork, adding the olive oil in a thin, steady stream until you have achieved the desired consistency. Add salt and pepper to taste.
Enjoy with some crusty bread and a crisp glass of white wine!

Posted by
Irene
at
12:56 PM
20
comments
Labels: Appetizers and Side Dishes
Sunday, July 12, 2009
Zucchini & Summer Squash Gratin
I used to think of myself as a spring/fall girl. At least, that's what I always told people. I feel like I come alive in April and October with its golden sunsets and apple pies has that certain ephemeral charm. But I think I might have been wrong. People, I think I am an undercover summer lover.
Maybe it's just that this particular summer has me bewitched. This summer's been simply glorious. I don't remember skies ever being quite this blue or the breeze being quite this gentle. The temperature hovers around a perfect 80F and the farmers' markets are bursting with plump, velvety cherries and red-cheeked nectarines. It all has my head spinning just a little.
This gratin was the product of my Saturday morning farmers' market loot and it just tastes like July and picnics in the park and lazy dinners on the porch. Unlike the hearty, cheesy potato gratins we all love when the thermometer dips, this is light and bright with flavors, the soft zucchini and summer squash getting a little zing from a sprinkling of feta and a dash of lemon juice. If, like me, summer has you firmly in its hold, this dish will hit just the right the spot.
Zucchini & Summer Squash Gratin
serves about 4-6
2 zucchini
2 summer squash
4 eggs
1 cup milk
4 oz feta cheese, crumbled
2 teaspoons dried or fresh thyme
1 tbsp lemon juice
salt and pepper to taste
Turn the oven to 350F and butter and 8x8 in. baking dish or 4 individual baking dishes. Slice the zucchini and the squash into thin slices, about 1/4 of an inch. Toss the vegetables with the lemon juice.
Make a layer of the slices on the bottom of the baking dish, overlapping each piece. I made separate layers of zucchini and separate layers of squash, but it doesn't matter, you can mix it up. Sprinkle with salt and pepper. Continue until you have layered about half of the vegetables. Then, spread half of the feta on top. Continue layering until the vegetables reach just below the top of the baking dish. Sprinkle with some more salt and pepper. Depending on the size of the vegetables, you may have some slices left over; roast them and throw them into a pasta later.
Whisk the eggs and milk together and pour over the gratin. The liquid should almost cover the vegetables. Then, spread the rest of the feta on top and sprinkle with thyme. Bake until the vegetables are tender and the filling is set, about an hour (the filling will puff, but don't worry, it will settle down once you take it out of the oven).
Continued after the jump...
Posted by
Irene
at
6:11 PM
23
comments
Labels: Appetizers and Side Dishes
Wednesday, June 10, 2009
Stuffed Eggplant
I know that I promised you guys something that isn't a cake, and after sticking it through like twenty cakes with me, you definitely deserve it. So with that promise in mind, I walked into my local library this morning, hoping to run into a cookbook with something green on the cover, something that would make me want to sail full speed out to the farmer's market and buy out their supply of whatever is in season (not like I need an excuse to do that, but still).
The first thing I noticed was the abnormal number of babies. Seriously, there were babies everywhere - on the floor, on the counters, flipping through yesterday's copy of the London Times... It was like a "Where's Waldo?" game, only with ... babies. Ookay, weird. The librarian behind the counter looked at me strangely and said (in what I thought was an unnecessarily snooty voice), "Are you here for... story time?" She paused slightly and added for full effect "MA'AM," making me feel like I was all of a hundred, instead of a young'un of 30. All the babies and their mammas promptly turned their suspicious eyes towards me and I was stuck, looking like a deer in the headlights, to mumble meekly "oh, sorry" and beat a hasty retreat. It turns out that the library actually closes for two hours of 'story time,' and as I didn't have the required accessory to participate, I decided to nix the cookbook idea and make you my grandma's stuffed eggplant instead. It's really good, trust me, and considering that I braved a whole battalion of babies for you guys, I really think you should just make it. :)
It's been pretty busy here at Chez Irene lately. Summer is the season of birthdays in my family, which means a lot of celebrating, but between all those cousins, all that tequila and that pesky job thing that's been taking up more and more of my attention, there has been very little time for anything else. So please forgive me if I'm not as active here and and on your blogs as of late and don't get mad if I take a little longer to respond to your emails. I hope everyone's just as busy with their own cousins and tequila (a killer combination) to notice my brief absence.
My Grandma's Stuffed Eggplant
(serves 6)
3 Japanese (or Italian) eggplant
3/4 lb ground beef (or turkey)*
1 large tomato
1/2 of a yellow onion
6 oz mushrooms
2 cloves of garlic, crushed
1 tsp of cumin
1 tsp dried oregano
a handful of parsley leaves, chopped
shaved Parmesan to top
olive oil
salt & pepper, to taste
*If you wanted to make this a vegetarian dish, simply do not use beef and use 1 onion instead of 1/2 and 10 oz of mushrooms instead of 6 oz. You can also mix in some cubed feta and pine nuts, chopped olives, etc.
Wash the eggplants, cut off the tops and slice each eggplant in half. Using a small paring knife and a spoon, cut/scoop out the insides of each half. Do not cut through the skin and leave enough eggplant inside so that the halves can stand on their own (they will look like little boats). Sprinkle with salt and arrange in a baking dish.
Chop the scooped out part of the eggplant into small squares. Chop the onion, tomato and mushrooms as well. Heat 2 tbsp of olive oil in a frying pan on medium heat and add the onions and garlic. Saute for 2 minutes, until the onions are just translucent, then add the mushrooms. Saute for another minute, until the mushrooms give off liquid, and add the eggplant and the tomato. Saute for about 5-8 minutes, until the eggplant is soft and cooked through, then add salt and pepper to taste.
While the vegetables are sauteing, heat a tablespoon of olive oil in another pan and brown the ground beef. Season with salt, pepper, cumin and oregano. Make sure the beef is cooked through completely. Add the beef to the vegetables, then stir in chopped parsley. Adjust the seasoning one last time.
Preheat the oven to 400F. Fill the eggplant boats with the beef/vegetable mixture and sprinkle the tops with shaved Parmesan. Pour a little bit of water into the baking pan, just to cover the bottom (this helps the skins of the eggplant to bake), drizzle with a little bit of olive oil and bake for 30-40 minutes, until the eggplant is very soft. Garnish with chopped parsley and serve immediately.
Posted by
Irene
at
3:08 PM
31
comments
Labels: Appetizers and Side Dishes, Russian
Tuesday, March 17, 2009
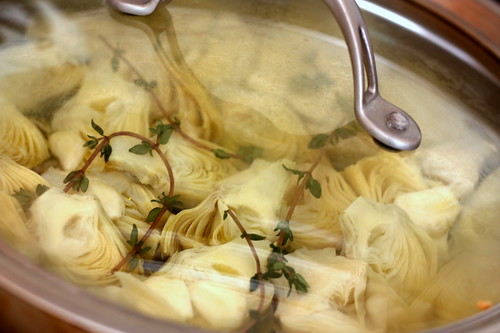
Braised Baby Artichokes with Garlic, Thyme, and Parmesan
By the end of the morning -- even though I felt like I'd run a marathon and my mom was still as fresh as the strawberries you see in the photos above -- we were both eager to go home and do something with the bounty we scored at the market. Specifically, braised baby artichokes with garlic, thyme and Parmesan from my new favorite book, Chez Panisse Vegetables. Warming our hands over the stove and soaking up the juices with my favorite whole grain bread, we thought it was the perfect end to a perfect day.
Braised Baby Artichokes with Garlic, Thyme, and Parmesan
1 lemon, halved
About 20 very small artichokes (as you can see in the photo, mine were slightly larger than "small", so I used about 15 and sliced them in half after peeling)
5 large cloves garlic, thinly sliced
1/3 cup olive oil (I dialed this back to 1/4 cup)
1 cup water
4 sprigs thyme
Salt
Parmesan cheese
Fill a medium-sized bowl with cool water, and squeeze 1 half of the lemon into the water.
Cut off all but about half an inch of the artichoke stems, and trim off the tops to remove any thorns. Break and peel off the outer layers of leaves until the tender, yellowish inner leaves show. (Irene's note: it's also possible to use bottled artichokes preserved in water for this. Shh... I won't tell. If that's what you are doing, skip to the next paragraph.) If you want, pare the ragged edges of the base where the outer leaves were torn off. If your artichokes are only small – as opposed to very small – cut them in half from stem to tip. If there is a choke inside, use a demitasse spoon (or something similar) to scoop it out. As you finish working with them, drop the prepared artichokes into the bowl of lemon water.
In a shallow, nonreactive pan combine the artichokes, garlic, olive oil, water, and thyme. Season lightly with salt, cover, and bring to a gentle simmer. Cook for 10 minutes, until the artichokes begin to soften, shaking the pan occasionally. Remove the lid, raise the heat slightly, and cook for a few minutes more, shaking the pan occasionally, until the artichokes are soft and tender. Salt again, and squeeze the other half of the lemon into the pan.
Serve the artichokes warm, with some of their liquid and with curls of Parmesan on top. (Irene's note: I would also have generous slices of warm farmer's bread or baguette to sop up the juices - that's the best part!)
Serves 4. Continued after the jump...
Posted by
Irene
at
9:40 AM
25
comments
Labels: Appetizers and Side Dishes
Saturday, November 22, 2008
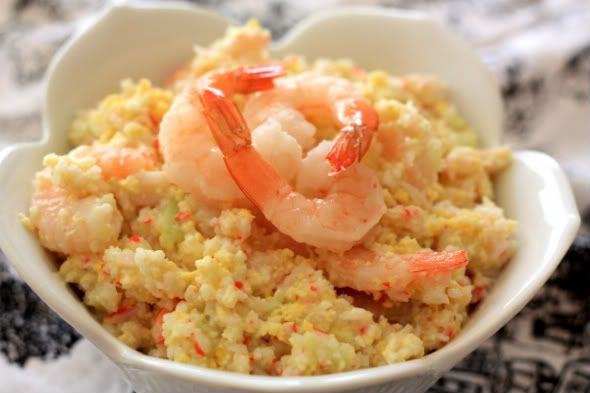
Best Crab Salad Ever
There are many things you will almost always find at a zakuski table -- pirozhki (meat or cabbage pies), salad Olivier (the Russian version of potato salad), cold cuts and pickled vegetables, and also crab salad. Russians love crab salad. I don't know why, I don't know how, but it's one of those things that invariably finds its way onto the menu, and I am invariably disappointed in its taste. There are many different ways to make it, but usually it involves chunks of crab and cucumbers swimming in a mayo or buttermilk-based dressing. Um. Not my idea of a good time, I can tell you.
Once I tasted my mother in law's crab salad, however, all my crab salad dreams were answered. People, this is the best crab salad ever, and I am not prone to hyperbole here. Her secret is to use the food processor to do the chopping, which produces the tenderest little flakes of crab and egg, mixed with a little fresh, crunchy cucumber and larger, succulent shrimp.... as my dad says, it's a song. There is maybe 1 tablespoon of mayo in the whole thing because the cucumbers give off enough moisture to hold it together, and my MIL sprinkles the salad with a little masago (smelt fish roe) for crunch, and it's just... so, so good. No more chunks, no more dull flavors. Every ingredient shines. And best of all (besides the taste) is that it's the quickest dish in the world to make. If you have your ingredients ready, give yourself 5-10 minutes with the food processor and it's done. Bring a little Russian flavor to your holiday table this Thanksgiving!
Best Crab Salad Ever
(via my MIL)
makes a large bowl
1 lb crab meat, cooked
1 lb medium shrimp, cooked, peeled and tails off
6 eggs, hardboiled
6 small cucumbers (or one of the huge English cucumbers)
1-2 T mayonnaise
2-3 T masago (optional)
Put all your ingredients in prep bowls and make a large salad bowl ready.
Put the crab meat in the food processor and give it a few pulses until the crab is reduced to tiny flakes and no large pieces remain. Turn the crab out into the salad bowl.
Cut the hardboiled eggs in half and put into the bowl of the food processor, processing for a few seconds until the eggs too are reduced to small pieces and no large pieces remain. Turn out into a bowl next to the crab. I usually do this in two additions (so 3 eggs at a time), but if you have a larger food processor, you might be able to put all the eggs in there at once.
Chop the cucumbers very roughly and do the same thing with the food processor (a fwe pulses of 2/3 seconds each usually suffice). Watch out not to process too much so that the cucumbers don't become slush. Turn out into the salad bowl.
Remove the tails from the shrimp and turn them out into the bowl as well (reserving a few for decoration). Mix the lot with about a tablespoon of mayo. Add more mayo, salt and pepper to taste, making sure all the ingredients are distributed evenly. If you are using masago, mix in about 2 tablespoons with the rest of the ingredients. Arrange the left over shrimp on top decoratively (and if using masago, sprinkle with the left-over tablespoon of masago).
Posted by
Irene
at
11:14 AM
6
comments
Labels: Appetizers and Side Dishes, Breakfast and Brunch, Poultry Seafood and Meat, Russian, Soups and Salads
Thursday, August 28, 2008
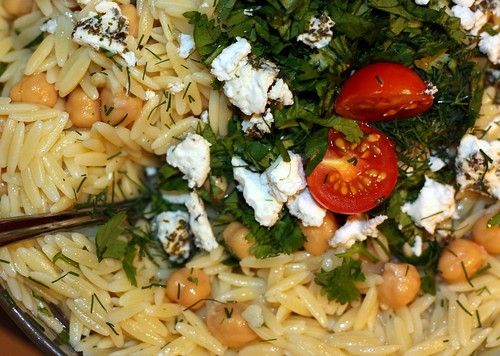
Orzo with Garbanzo Beans, Herbs and Goat Cheese
Summer is almost over, but I'm a rebel at heart and I don't want to let go. Shhh... don't tell me that September is creeping up on us, no no. Not for me, the harsh reality. Let's just pretend it's still June and I will tell you about this awesome dish I made today. Really, I don't know what else to say but that you have to go and make it. Right now. Once you finish reading the recipe, that is. It's going onto my top easy dinners list, because I made it, I tasted it, and I just had to keep on tasting. Phew, it's a good thing the recipe yields a lot!
The thing that I love so much about this dish is that it lets each ingredient shine without overwhelming any of the others. It's like being at a party where all the people are beautiful (but not having to listen to inane conversation). The orzo is tender and firm, the garbanzo beans give it some crunch and flavor, the lemon zings, the herbs dance, the goat cheese provides some texture, and the olive oil -- you have to use a really good one for this -- is kind of like a tequila shot, in that it makes everyone happy. See, I told you it's like a party! It's a perfect side dish, with a mild flavor that isn't actually boring, and it's probably less time consuming than almost anything else I've ever made. Small on effort, big on the taste? That's my kind of cooking! Tasting it put me right back into the middle of summer, at a brunch by the pool, with some pita bread, grilled chicken and maybe a tequila shot or two (I'm very specific in my fantasies).
Orzo with Garbanzo Beans, Herbs and Goat Cheese
(adopted from Bon Appetit, June 2008)
*The original recipe called for oregano, but I love the fresh taste and smell of cilantro, so I threw that in instead, and I also chopped up some dill and added a little extra lemon juice. The great thing is that you can play around with whatevere you have on hand -- rosemary would be delicious also, and I could see this with chopped tomatoes and basil.
1 1/2 cups orzo (about 9 ounces)
1/4 cup olive oil
3 tablespoons fresh lemon juice
1 garlic clove, minced
1 15- to 15 1/2-ounce can garbanzo beans (chickpeas), rinsed, drained
2 tablespoons chopped fresh oregano (*note: I put 4 tablespoons of chopped cilantrol and 2 tablespoons of chopped dill)
1 5-ounce log soft fresh goat cheese, crumbled (about 1 cup) (*note: I found this to be twice as much goat cheese as I really wanted, so add about half of that first and then add more if you're a goat cheese fan)
Cook orzo in large saucepan of boiling salted water until just tender, stirring occasionally. Drain orzo.
Whisk olive oil, fresh lemon juice, and minced garlic to blend in large serving bowl. Add drained garbanzo beans, cooked orzo, and chopped fresh herbs; toss salad to coat (make sure to get all the way to the bottom where the lemon juice likes to go). Season salad to taste with salt and pepper. Gently stir in crumbled goat cheese. Serve orzo salad warm or at room temperature. Yeah, that's it!
Posted by
Irene
at
6:41 PM
2
comments
Labels: Appetizers and Side Dishes, Pasta Pizza and Quiche, Soups and Salads