Showing posts with label Other Yummy Desserts. Show all posts

Friday, June 25, 2010

Small Batch Peach Jam

IMG_6730

Sometimes, it only takes half an hour for magic to happen in the kitchen. It took only half an hour for these gorgeous, but sadly hum-drum tasting peaches to be transformed into the multi-layered, golden deliciousness of peach jam. If I hadn't prepared it myself, I would not have believed that such a transformation was possible, aided only by some lemon juice, sugar and a few drops of vanilla and almond extracts - but indeed, it happened, and I'm here to tell you that I've found the answer to all that sad, tasteless fruit that all of us come across but feel too guilty to throw away.

IMG_6616
12-06-31

I have to admit that real jam-making isn't (yet) for me. The thought of buying up large quantities of fruit, simmering it in a large pot (which must feel a bit like a Macbeth witch, I'm imagining) and then *shudder* sterilizing the cans properly just really freaks me out. This, however - this is easy peasy. Let's say that, like me, the peaches you bought aren't all that you thought they would be. Or you found some strawberries in the back of the refrigerator that look like they've seen better days. You just take this neglected fruit, add some lemon juice, sugar and some extracts, simmer a bit on the stove and watch the magic happen. I promise you, it's a darn good show.

12-06-32

Small Batch Peach Jam
Adapted from David Leite

4-5 cups of thinly sliced peaches or other fruit
1/2 - 3/4 cup sugar, depending on how sweet the fruit is
Juice of 1 lemon
1/2 tsp vanilla extract
1/4 tsp almond extract

Slice peaches thinly and, in a large bowl, combine with lemon juice, sugar and extracts. Stir to dissolve sugar and leave in the refrigerator to macerate overnight [I left mine in there for an hour].

Drain out all the juices into a heavy-bottomed sauce pan. Add half the fruit, bring to a boil, reduce the heat to low and simmer for about 15 minutes, until the juices are just thickened.

Cool it down for 10 minutes, then transfer to a food processor or blender and puree until smooth.

Transfer back to the pan and add the rest of the fruit. Bring back to a boil, then reduce the heat to low and simmer gently for another 15-20 minutes. To test if the jam is ready, drop a heaping teaspoonful onto a plate and slightly tilt the plate. The jam should not run off, but cling and slowly glide down. If the jam isn’t ready, put it back on the heat for a while.

Spoon the jam into small jars and refrigerate or spoon into resealable plastic containers and freeze. You need to keep it in the fridge and use it up fairly quickly [but I guarantee that this will not be a problem - it's DELICIOUS].

Continued after the jump...

Thursday, October 8, 2009

Apple & Ricotta Tartlets

IMG_3515

My mom has been making homemade ricotta since I was a little girl. It evokes for me the scents of our small kitchen and the feel of her linen apron against my cheek as the soft, fresh whiteness of the cheese magically turned into tarts, fritters and other such delicacies that I adored. When I moved out on my own, I had this crazy idea that I should learn how to do it myself, but then I decided to take the easy way out and punted back to my mom, and she still makes ricotta for me any time I like. What can I say, I'm a spoiled kid!

IMG_3430
Z_Dump for Photos1

To tell you the truth, what I love doing best is just eating it straight from the little glass bowl that I usually get in my goodie bag, but this time, mom outdid herself and the bowl was so large that I was practically forced to use it in other ways. There's only so much ricotta and honey on toast that a girl can take, you know.

I decided to create a little afternoon snack - to go with a cup of tea, perhaps - and since the cooler weather inevitably brings out my inner Brit, I wanted it to be a dainty confection, as fun to make as it is to eat. After I took these out of the oven, I thanked my lucky stars that I was afternoon-tea-ing by myself today because no way would I have shared any of these with anyone else. Ok, maybe I would have shared with my mom, but that's it! The tender, delicate apples cupped a custard-like nugget of sweet ricotta, and the smell of it all, of apple orchards and afternoons in my mom's kitchen, almost sent me into another world. Instead of life being like a bowl of cherries, I'd much rather that it be like these wonderful little tartlets - you know exactly what you're going to get, and it's going to be delicious.

IMG_3423

Apple and Ricotta Tartlets
(makes about 8 servings)

8 oz fresh ricotta cheese
4 medium apples (I used Gala, but any firm variety will do)
4 tbsp sugar
1 tsp vanilla extract
1 egg
butter for buttering muffin tin

Turn oven to 350F and butter well 8 cups in a standard-sized muffin tin. Peel the apples, cut them in half and remove the stem and the core. Then, slice the apples into as thin slices as you can manage - the thinner, the better. If the slices are too thick, they won't bend and you'll end up with a bunch of broken pieces which, although delicious, isn't what you're aiming for here.

In a small bowl, mix the ricotta with the egg, sugar and vanilla extract until everything is well incorporated.

Arrange the apple slices in overlapping circles inside the muffin cups. They will look like flowers with a large opening in the middle. Drop ricotta into the opening, doming it a little on the top.

Bake for about 30-35 min, until the apples are very tender and the filling is set and slightly puffed. Let cool for a few minutes and then gently remove with a fork or a small spatula. Serve warm.

Continued after the jump...

Saturday, May 2, 2009

Chocolate-Dipped Strawberries

IMG_9847

I am lucky to have a friend. She is one of those very rare and beautiful people, I think you know what I mean. The kind of friend whom you can't imagine your life without and whose kids you love like they were your own from the first moment they enter the world. She has a beautiful soul, the warmest hugs and the sweetest smile. Really more a sister than a friend.

Food Photos1-10

My friend is about to bring her second son into the world, the cycle of life and birth beginning again and just in that magical time when the world is waking up, shaking the cobwebs out of its corners and clothing itself in brilliant colors. It's going to be a brilliant baby, just like her first one, and I don't only mean that he's going to be smart. He is going to bring her joy.


Food Photos1-11

It was her birthday yesterday and I wanted to tell her "I love you" because, let's face it, we just don't say it often enough to the people who should hear it. Maybe I didn't say it in words (I'm still working on that, it's always difficult for me to express it verbally, especially when it really means something), but I said it in chocolate-dipped strawberries.


IMG_9802

This recipe is from Jen Yu's website, Use Real Butter, which is one of my daily reads. Jen, I know you only through the magic of the internet, which is to say I do not know you at all, but when I made these, I was thinking about you, and of family, friendship, love.


Chocolate-Dipped Strawberries
via Use Real Butter

24 ripe strawberries (Jen prefers organic, and I do too)
8 oz bittersweet chocolate, chopped (Valrhona 64% is always great, but I used Lindt)
1 oz white chocolate, chopped

Rinse strawberries and gently pat dry. Set on a rack to dry completely. Melt bittersweet chocolate in a double boiler.

Dip strawberries in chocolate and shake off excess. Set to dry on a rack (on the tops as shown in the photos) or on parchment (on the bottoms which will give you a foot of chocolate) in a cool, dry location [Irene's note: I let mine dry in the kitchen for a half hour and then got impatient and put them in the refrigerator].

When chocolate has dried, melt the white chocolate and drizzle over the strawberries [Irene's note: melting white chocolate is trickier than dark, you have to watch it continuously and make sure the heat is low and no steam or water gets into the chocolate. I put the melted chocolate into a ziploc bag with a tiny piece cut off the corner]. Or, you can melt more white chocolate and dip the strawberries a second time.

More chocolate-dipped strawberries:


Ash keeps it simple and classic
Elise dresses hers up like little grooms, complete with mini tuxedos
April takes it one step further and adds cheesecake, oh my!
Paula goes nuts with toppings
And for something a little different, a strawberry-Nutella panini (wow!)

Continued after the jump...

Monday, January 19, 2009

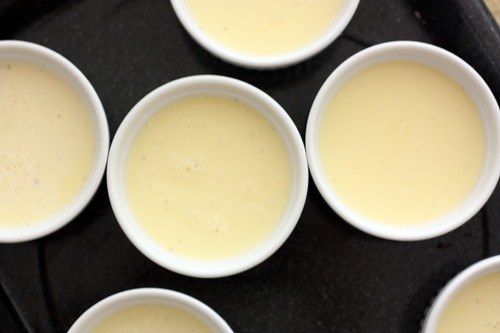
Vanilla bean creme brulee topped with blueberries and vanilla sugar

I can't believe that over a year has passed since I started this blog (!!) and I've still never told you about my favorite dessert. It also happens to be one of the easiest desserts to make for a 4-8 people dinner party (coincidence? I don't think so). Creme brulee is not fussy or complicated, but it's elegant and smooth like George Clooney in a tux, has depths of flavor, a crackly sugar crust and is infinitely adaptable (I've infused it with edible lavender or pieces of banana, just to name a few ways). And people, I'm all about things you can prepare 24 hrs in advance and finish off with a blowtorch.


So if this dessert is so amazing, you say, how come Irene has never peeped a word about it on this blog? Well... You see... I've been saving it for you, so to speak, until I could make it at the height of perfection -- and we all know that this means a real vanilla bean. Sure, I've made this with vanilla extract at least 10 times and it's always been phenomenal, but using a real vanilla bean just elevates it in ways that you can't really describe until you inhale the elusive scent of this pod of the vanilla orchid and just know that there is something different here, something special. Fresh blueberries and a sprinkle of vanilla sugar give this dessert an extra decadence, as if it needed any.


There are only two secrets to a successful creme brulee, and they are, well, not rocket science. (1) Don't curdle the egg yolks, and (2) bake the custard in a water bath. However much you are tempted to rush these steps, don't, because the smooth, silky creaminess at the end will all be worth it.


Creme Brulee
(recipe from a Williams & Sonoma cookbook - serves 4)

2 cups (16 oz) heavy cream
4 egg yolks
pinch of salt
1/4 cup plus 4 tbsp of sugar
1/2 vanilla bean (or 1 tsp of vanilla extract)
optional for topping: about 1/4 cup of blueberries, 1 tbsp vanilla sugar

Preheat an oven to 300°F. Have a pot of boiling water ready. Line a baking pan that is 2 to 3 inches deep with a small kitchen towel (I've skipped lining the pan with a towel lately and it didn't seem to affect the finished product).

Using a paring knife, split the vanilla bean lengthwise down the middle and scrape the seeds from 1/2 of the bean into a 2-quart saucepan. Add the cream, stir to mix and set the pan over medium-low heat. Warm the cream until bubbles form around the edges of the pan and steam begins to rise from the surface. Remove from the heat and set aside to steep, about 15 minutes. (Note 1: If using vanilla extract, warm the cream as directed without the vanilla bean - you can use the cream right away without steeping) (Note 2: if using a vanilla bean: at this point, store the half of the bean that you didn't use and submerge the empty half in a cup of sugar for a few weeks to get vanilla sugar).

In a large bowl, whisk together the egg yolks, salt and the 1/4 cup sugar (and vanilla extract, if using) until smooth and blended. Drizzle about 1/4 cup of the warm cream into the egg yolks to temper them (so that the yolks don't curdle), whisking all the while, then gradually add the rest of the cream, whisking until blended. Pour the custard through a fine-mesh sieve set over a bowl. Divide the custard among four 5- or 6-oz. ramekins and place the ramekins in the prepared baking pan. Add boiling water to fill the pan halfway up the sides of the ramekins. Cover the pan loosely with aluminum foil and bake until the custard is set around the edges and jiggles only a little bit in the middle, 35-40 min (note: this has taken me anywhere from 40 - 60 minutes, so check every 5 minutes after the 35 minute mark).

Transfer the ramekins to a wire rack and let cool to room temperature. Cover with plastic wrap and refrigerate for at least 4 hours or up to 3 days.

Just before serving, sprinkle 1 Tbs. of the sugar evenly over each custard. Using a kitchen torch, melt the sugar according to the manufacturer's instructions. Serve immediately.

(Note 3: To top, toss 1/4 cup of blueberries in about a tablespoon of vanilla sugar and divide among the 4 ramekins. Even if you've just submerged your vanilla bean when you started making the custard, your sugar will already smell like vanilla and you can use it. However, leave the rest of the sugar to infuse for 2 weeks to get the amazingness that is real vanilla sugar).

Continued after the jump...

Saturday, January 17, 2009

Cream Puffs

When I was growing up, my parents taught me to share. Sure, I didn't see the wisdom of it then - after all, my favorite dolls were, by definition, mine, but I grudgingly accepted their lordship over me, all the while muttering stubbornly that "when I grow up," I won't stand for any of this sharing nonsense. Well, I did eventually grow up, and as you can all guess, I realized that my parents were right about oh, so many things, but also about sharing (and now I mutter, "they always had to be right, didn't they...").

Living in the big city, however, I'm learning that sharing is just not the thing here amongst the "in" crowd. Apparently, people do not share, among other things: recipes, telephone numbers of their maids, hair salons, favorite restaurants, car dealerships, projects they are working on, the place they buy their All Clads on sale and, last but not least, their husbands (just kidding, I don't share mine either, but I just wanted to see if you were paying attention!). I guess I have to resign myself to not being part of the "in" crowd because, really, it all makes no sense to me (except the bit about husbands - I wasn't kidding, I don't share A., don't even think about it ;) ).

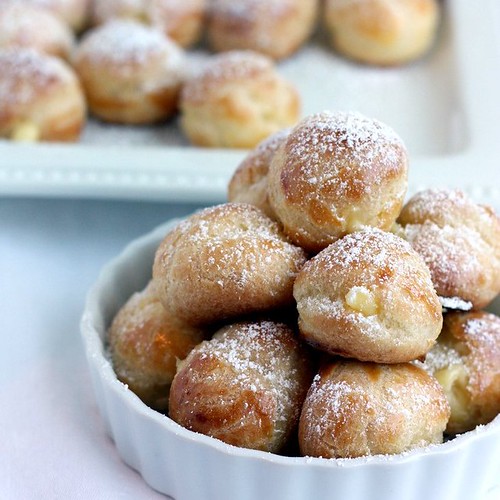
The recipe for these cream puffs comes from my friend Amy, who generously did not mind sharing it not only with me, but with all of you as well. It was my first time making cream puffs and I was worried about many things (will they puff? how will I know when the dough is ready? can I really beat the eggs in *by hand*?). Even if you've never made them before, just trust me - when each step is supposed to be complete, you will *know.* These little puffs are very easy to make, and very, very good! I filled them with Dorie's pastry cream and mmmmmmm...... they were gone before I even had a chance to serve the tea (good thing I'm sneaky and hid one for myself before the guests arrived).

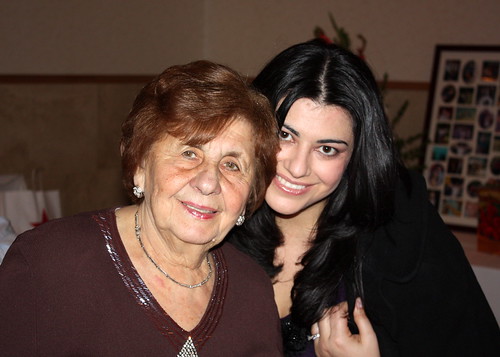
And, since I talk about my grandmother so much here, and since she makes the best cream puffs in the world (but won't give anyone the recipe, lol), let me post a recent picture of us together. Enjoy the cream puffs!


Cream Puffs
(via my friend Amy, via Fine Cooking)

Pastry Recipe:
1/2 cup water
2 oz. (4 Tbs.) unsalted butter, cut into pieces
1 Tbs. sugar
Pinch salt
2-1/4 oz. (1/2 cup) all-purpose flour
2 large eggs, at room temperature

For the egg wash:
1 large egg yolk, at room temperature
1 tsp. milk

Position a rack in the center of the oven and heat the oven to 400°F. Line a baking sheet with kitchen parchment. In a small saucepan, combine the water, butter, sugar and salt. Bring to a boil over medium-high heat. Add the flour and stir vigorously with a wooden spoon until smooth without any lumps and the batter pulls away from the sides of the pan. Remove from the heat and beat with a wooden spoon just until the steam stops rising, about 1 minute.

Add one egg and beat well with the wooden spoon. The batter will seem to break apart, but keep working until it becomes smooth. Add the second egg and beat again until the mixture is completely smooth.

Scoop the batter into a pastry bag fitted with a 1/2-inch plain pastry tube (Ateco #5). Hold the bag about 1 inch above a parchment-lined baking sheets and pipe out mounds about 1 inch in diameter (Irene's note: I made two sizes - 1 inch and 2 inch). Beat the egg yolk with the milk to make an egg wash. Lightly brush the egg wash on top of each puff with a pastry brush, tapping down any points of dough. (Amy's note: I have used two spoons and dropped them on to a cookie sheet, but a pastry bag makes them turn out a little more uniform. Also, you can use a broad star to give them even more shape)

Bake until the pastries are puffed and deep golden, 22 to 24 min. (Irene's note: after mine were done, I turned off the oven, propped the door open with a wooden spoon and let them dry out for another 10-15 min). Let cool on a wire rack. If not using the same day, transfer to a plastic bag and freeze for up to four months; thaw in the refrigerator overnight before using.

From Fine Cooking 49, pp. 72

(Irene's note: After the puffs cooled, I then used my smallest plain tip to fill them with Dorie's pastry cream - yum! I think I was a little over-enthusiastic and filled them all the way up, which resulted in the tops getting a little soft from the cream. Next time, I will fill them only half way.)

Dorie Greenspan's Pastry Cream
2 cups whole milk
6 large egg yolks (I'm going to use a few less next time to cut some calories)
1/2 cups sugar
1/3 cup cornstarch, sifted
1 1/2 teaspoons pure vanilla extract
3 1/2 tablespoons unsalted butter, cut into bits at room temperature

Bring the milk to a boil in a small saucepan.

Meanwhile, in a medium heavy-bottomed saucepan, whisk the egg yolks together with the sugar and cornstarch until thick and well blended. Still whisking, drizzle in about 1/4 cup of the hot milk– this will temper, or warm, the yolks so they won’t curdle. Whisking all the while, slowly pour in the remainder of the milk. Put the pan over medium heat and, whisking vigorously, constantly and thoroughly (making sure to get the edges of the pot), bring the mixture to a boil. Keep at a boil, still whisking, for 1 to 2 minutes, then remove the pan from the heat.

Whisk in the vanilla extract. Let sit for 5 minutes, then whisk in the bits of butter, stirring until they are full incorporated and the pastry cream is smooth and silky. Scrape the cream into a bowl. You can press a piece of plastic wrap against the surface of the cream to create an airtight seal and refrigerate the pastry cream until cold or, if you want to cool it quickly–as I always do–put the bowl into a larger bowl filled with ice cubes and cold water, and stir the pastry cream occasionally until it is thoroughly chilled, about 20 minutes.

Chocolate Sauce
3 oz. bittersweet chocolate, finely chopped
1 oz. milk chocolate, finely chopped
1/2 cup heavy cream

In a metal bowl set over a saucepan of simmering water, melt the bittersweet and milk chocolate, stirring with a rubber spatula until the chocolate is completely melted. In a small saucepan, heat the cream over medium to just below the boiling point. Remove the bowl of chocolate from the pan of water and wipe the bottom and sides dry. Pour the hot cream into the melted chocolate and stir with the spatula until the sauce is cool, about 4 min. The sauce can be made up to two weeks ahead and stored in the refrigerator; before serving, warm the sauce in a metal bowl set over a pan of simmering water.

From Fine Cooking 49, pp. 73

Continued after the jump...
Sunday, September 14, 2008

Afternoon Tea, Part II - Lemon Bars


Lemon bars are my favorite dessert. There is something about the creamy, tart filling combined with a thin layer of crisp, sweet shortbread that just makes my mouth water, and even as I'm typing now, I have the biggest urge to just leave the keyboard and run to the kitchen to make another batch. But I promised you the recipe, and I wouldn't disappoint my *cough* adoring public (as A. says, I'm the queen of shameless plugs). I can tell you that this is now my favorite, go-to recipe, and I've made it twice, and twice it's disappeared faster than I could say "all-purpose flour." In fact, about 5 minutes after I gave these out at work, I heard loud moans coming from my co-worker's office, and as I crept by quietly (hoping not to catch anyone in flagrante delicto), I heard, "I LOVE YOU IRENE!" Ok, maybe that should have been a PRIVATE moment between the guy and his lemon bar, but it's always nice to know that someone loves you, even if only because you feed them. The point is, these lemon bars are GOOD and you should make them right away so that I can feel the love!


The recipe comes from my favorite dessert cookbook, that I've mentioned a bunch of times before, called Tartine. It simply rules. If I didn't already have a copy, I would go out and buy one immediately. Everything sounds delectable and everything I've made from it has been A+. There are also great hints and tips about technique that are really useful to have. Anyway, enough of my gushing, it's just that this book has really come through for me and I wanted to recommend it without reservations.

Lemon Bars on Brown Butter Shortbread (Tartine)

(yields 12 3x3 1/4-in bars, or one 9x13 baking pan)

Crust
1/2 cup confectioner's sugar
1 1/2 cups all-purpose flour
3/4 cup unsalted butter, at room temperature (for pareve, replace with margarine or vegetable shortening)
1/2 cup pine nuts (optional) - I never use these

Filling
1/2 cup all-purpose flour
2 1/4 cups sugar (I cut this down to 2 cups, because, wow, lots of sugar)
1 cup + 2 tbsp lemon juice
Lemon zest, grated, from 1 small lemon
6 large whole eggs
1 large egg yolk
pinch of salt

Confectioner's sugar for topping (optional)

Preheat the oven to 350F. Butter a 9x13-inch baking pan.

To make the crust, sift the confectioner's sugar into the bowl of a stand mixer fitted with the paddle attachment. Add the flour and stir to mix. Add the butter and pine nuts (if using) and beat on low speed until just a smooth dough forms.

Transfer the dough to the prepared pan and press evenly into the bottom and 1/2 inch up the sides of the pan. It should be about 1/4 inch thick. To help even out the crust, use the flat bottom of any type of cup, pressing down firmly. Line the crust with parchment paper and fill with pie weights. (Irene's note: I find pie weights to be a hassle, so I usually freeze the crust for 1/2 hour and line with a piece of buttered foil, buttered side down, for 1/2 of the baking time). Bake the crust until it colors evenly to a deep golden brown, 25-35 min. Rotate the pan 180 degrees if the crust appears to be baking unevenly.

While the crust is baking, make the filling. Sift the flour into a mixing bowl. Add the sugar and whisk until blended. Add the lemon juice and zest and stir to dissolve the sugar. In a separate mixing bowl, whisk the whole eggs and egg yolk with the salt. Add the eggs to the lemon juice mixture and whisk until well mixed.

When the crust is ready, pull out the oven rack holding the crust and pour the filling directly into the hot pan. (It is easier to pour the custard into the pan if the pan is in the oven.) If the crust has come out of the oven and cooled before you have finished making the filling, put it back in for a few minutes so that it's hot when the custard is poured. Reduce the temperature to 300F and bake just until the center of the custard is no longer wobbly, 30-40 minutes.

Let cool completely on a wire rack, then cover and chill well before cutting. Using a sharp knife, cut into 12 squares, or as desired. If you like, dust the tops of the squares with confectioner's sugar. They will keep in an airtight container or well covered in the baking dish in the refrigerator for up to 4 days (Irene's note - yeah, right, not a chance; good luck keeping them for more than 4 minutes).

Continued after the jump...