Showing posts with label The Basics. Show all posts

Thursday, November 19, 2009

Basic Sweet Yeast Dough

IMG_4425

I realized recently that the only place I've ever felt really at home was in Israel. Israel, with its amalgamation of cultures and flavors, with loud music and brash cabbies, with huddled market stalls and glowing Jerusalem stone, with complete strangers being all up in your business, with greenery where you least expect it and laughter that only underscores the strength of the spirit - it seems funny to think that a piece of me will always stay there, but it's the truth.

IMG_4240
Z_Dump for Photos1-2

Being Jewish was kind of a dirty word where I grew up in Ukraine, and having been isolated by the Communist regime from any vestiges of religion, being Jewish was confusing here in the US. American Jews were free to be Jewish and to be proud of it, and to me, a novice, it seemed like they all spoke some different, secret language to the translation of which I was not privy. In Israel, however, I could be myself. Ironically, I felt the least religious in this Jewish state - I didn't attend services nor did we differentiate between Jews and Arabs in our weekly dinners at the Haifa Uni dorms - but it was here that I found a strong and lasting connection to my roots. Because there was no pressure to be anything or belong to any group and because the hills, the stones and the air itself are saturated with history, I discovered what it really means to have my heritage, to own who I am and make it part of myself. It's a testament to the beauty of that country and to the strength of its people that I could learn what I did and take it, carrying it with me for the rest of my life like a gift.

IMG_4337

This recipe is a classic Jewish recipe. My grandmother makes something similar and her grandmother did too. The bread it produces is soft, moist and lightly sweet - the kind of dough you can use for almost anything, from pan dulce to challah to cinnamon buns to apple cakes like the one I baked. It made the house smell fantastic. When I bit into a piece, fresh out of the oven, I said "SHUT UP OMG" really loudly, even though I was completely alone in the house. It was that good.

Basic Yeast Sweet Dough
from sadly out of print, but wonderful The World of Jewish Desserts by Gil Marks

*1 (1/4-oz) package (2 1/4 teaspoons) active dry yeast, or 1 (0.6 oz) cake fresh yeast
*1 cup warm water (105 to 115 degrees for dry yeast; 80 to 85 degrees for fresh yeast), or 1/4 cup warm water and 3/4 cup warm milk, or 1 cup warm water mixed with 1/4 cup nonfat dry milk
*1/3 cup sugar
*1/3 cup vegetable oil, peanut oil or softened butter
*2 large eggs
*1 teaspoon salt
*About 4 cups high-gluten flour or unbleached all-purpose flour

For apple topping
5-7 medium baking apples (I used Gala), peeled, cored and sliced
2 tablespoons of butter, melted
1/3 cup sugar
2 teaspoons cinnamon

In a large bowl, dissolve the yeast in 1/4 cup warm water. Stir in 1 teaspoon sugar and let stand until foamy, 5-10 minutes (if your yeast isn't foaming, start all over with fresher yeast).

Add the remaining water (and/or milk), sugar, oil (or butter), eggs and salt and whisk to combine. With a wooden spoon, stir in 1 1/2 cups of flour and then continue stirring in flour, 1/2 cup at a time, until the dough forms into a ball and comes away from the sides of the bowl.

Turn the dough into a well floured surface and knead, adding more flour to prevent sticking (I think I added another 1/2 cup), until smooth and springy, about 5 minutes. The dough should be soft and satiny, but you don't want to knead too long as you don't want too much gluten to develop. You can use a machine to knead, but I really like to do it by hand.

Place the dough into a lightly oiled bowl and turn to coat. Cover and let rise in a warm, draft-free place until nearly double in bulk, 1 1/2 - 2 hrs (or cover with plastic wrap and refrigerate overnight). To test if the dough is sufficiently risen, press two fingers 1 inch deep into the center; if the indentations remain, the dough is ready.

Punch down the dough. Fold over in three like a letter, give it a half turn and fold over like a letter again - this redistributes the yeast and its food. Let stand for 10 minutes to relax the dough.

While the dough is relaxing, peel, core and slice the apples, melt the butter and combine the sugar and cinnamon. Butter or spray a 9"x13" pan or two 9" round pans.

Arrange the dough in the prepared pan(s), stretching gently so that it touches all the sides and is more or less uniform in height. Arrange the apples on top, brush with butter and sprinkle with cinnamon sugar. Cover and let rise until nearly double in bulk, about 50 minutes.

Preheat the oven to 375F (350F if using a glass pan). Bake on the middle rack for 30 minutes or until puffed and golden (this cake has quite an oven spring!). Cool in the pan for 10 minutes and then cool on the rack for 20 minutes (aha, good luck with that). I like this cake warm with a cup of coffee or tea.

This cake can be frozen for up to 2 weeks. Reheat unthawed on 350F for 20 minutes.

Continued after the jump...

Monday, October 19, 2009

Apple Pie, Straight Up

IMG_3883

I've come to the conclusion that apple pie is all about subtlety. There's a basic ratio of apples to sugar to spices to crust, but these simple numbers tell you nothing at all of the flavors, smells and textures you can create with just a flick of a measuring cup. For this - my first apple pie - I wanted the flavors to be mine, just the way I like them. I wanted the crust to be flaky, tender and interesting. I wanted the apples to have that perfect balance of tart and sweet. I wanted the filling to be a little spicy, fork-tender and just a little gooey. Most of all, I wanted that smell, the apple pie, autumn leaves, refuge from the chill, begging for some ice cream smell that I dreamt would float out of the windows and make us so so happy.

Apple Pie-3
IMG_3744

Oh, I was so excited when I took this pie out of the oven. "Look," I said to A., "it looks and smells just like real apple pie!" He laughed, but he knew what I meant. Not having grown up in this country, it's always been a struggle to accept the best parts of American culture while keeping our own identity intact. Being able to re-create a dish that is so intrinsic to this part of the world (that over the years has become our very beloved home) while putting my own personal touches to it gave me a wonderful sense of completeness, of finally merging my two worlds into one (deliciously warm and spicy) whole.

IMG_3931
10-18-09_crop

Apple Pie

Crust (one double-crust pie)
3 cups all purpose flour
2 sticks (8 oz) butter, very cold
2 tablespoons granulated sugar
1 teaspoons salt
3 tablespoons ice water
1 tablespoon cider vinegar*
1/2 teaspoon cinnamon (optional)
1-2 tablespoons turbinado sugar for topping

*Helene, who is a reader and a wonderful baker, tipped me off that adding cider vinegar helps relax the dough for the rolling

Filling (for a deep dish pie)
1.5 lb Granny Smith apples (for tartness)
1.5 lb Golden Delicious apples (for sweetness)
1/2 cup granulated sugar
1/4 cup brown sugar (to make it a little gooey - if you don't like that, use all granulated sugar)
3-4 tablespoons all-purpose flour
1 tablespoon fresh lemon juice
1 teaspoon vanilla extract
1 teaspoon cinnamon
1/2 teaspoon nutmeg
dash of ground cloves
2 tbsp cold butter, cut into little pieces

Apple Pie-2

People - do not be afraid of a pie crust. It's really not that bad. There's no secret to it - just be prepared and work quickly. Here's what I want you to do:

1. Take out the butter and cut each stick into 16 little cubes. Put them in the freezer for at least 5 minutes.

2. Whisk the flour, sugar, salt and cinnamon together in a large bowl. Take a glass, fill it with water and put some ice in there to make it extra cold.

3. Take out and get ready your pastry cutter, rolling pin, a pastry scraper and a tablespoon for the ice water.

4. Drop the butter pieces into the big bowl with the flour, and working quickly, cut the butter into the flour until there are large pieces and small pieces. The smallest pieces should be about the size of a pea and the largest the size of a pecan.

5. Dribble about 3 tablespoons of ice water and 1 tablespoon of cider vinegar into the flour mixture and toss it gently with your fingers until the dough stays together when pinched (there will still be dry patches, that's ok). Add more water if you need to, in 1 tbsp increments. Do this quickly so the butter doesn't get a chance to melt. Pop the bowl into the freezer for 5 minutes and take a coffee break.

6. Dump the contents of your bowl onto a large counter, flour your rolling pin and pass it back and forth over the barely-together dough. What this does is flatten out the butter and coat it with the flour so that you ensure flakiness and tenderness. Using a pastry scraper, turn over the mixture so you get to roll the butter that's on the bottom as well as what was on top.

7. Gather the dough into a ball, divide in two, wrap in plastic wrap and refrigerate for at least an hour.

8. Make the filling - peel and core the apples and slice into 1/4 inch slices (I like my slices pretty thin so they become very tender and don't slide out). In a large bowl, toss with the sugars, spices, vanilla, lemon juice and flour. Turn to coat and let stand for 15 minutes, mixing several times to soften the apples. When you're ready to fill the pie, drain about half of the juices.

9. Preheat the oven to 425F, arrange a rack in the bottom third of the oven, butter a pie plate.

10. Take the dough out of the refrigerator, let it rest for 5-10 minutes to become pliable and roll out each piece between two sheets of plastic or parchment paper (I can't tell you how HUGE a fan I am of this method - no sticking, no mess, ahhh). After rolling, I like to put the crusts into the freezer for 2-3 minutes so that they are easier to transfer. Transfer one of the crusts to a buttered pie plate and prick it a few times with a fork.

11. Fill the pie with the apple filling (below), dot with the two tablespoons of cold butter and cover with the second crust. Crimp the edges together. Cut a few steam vents and sprinkle with turbinado sugar.

12. Bake on 425F for 30 minutes; then, slide a baking sheet under the pie pan to catch the juices, turn the heat down to 350F and bake for another 30-45 minutes until the crust has browned and the juices are bubbling (I found this method in Joy of Cooking and the combination of temperatures, as well as baking in the lower third of the oven, produces a perfectly baked, non-soggy crust).

Continued after the jump...

Sunday, September 13, 2009

Chocolate Cupcakes with Strawberry Buttercream

IMG_3023

Friends, let's talk cupcakes - dark, rich, chocolaty cupcakes; cupcakes with batter that practically begs you to lick the bowl; cupcakes which make you think, "Surely, I didn't say I'd bring all 12, right?" Draped in silky smooth strawberry buttercream, these will make you and everyone around you really happy. The beautiful thing about cupcakes is that you don't really need a reason to make them. A giant layered cake demands An Occasion, but cupcakes are your excuse to celebrate weekends, sunny days, getting-a-new-pair-of-shoes days and pretty much any day of the week that ends in "Y".

Food Photos1-28
Food Photos1-25

Oh, and did I mention the chocolate? And the pink strawberry buttercream? You'd better believe that these are good. I made them for my dear friend's baby shower and I wanted to tint the buttercream pink (because it's a girl!) without food coloring or any other artificial stuff. Strawberries frozen back in May came to the rescue and added just the right touch of flavor to balance the sweetness of the buttercream. Of course, strawberries and chocolate always play well together, and the girls loved them. Although, I'm pretty sure that - despite the ladylike pink color - even the most non-baby-shower-going manly man would also jump at one of these dark, rich beauties.

IMG_3018

Chocolate cupcakes with strawberry buttercream

Cupcakes (from Cake on the Brain via Cooks Illustrated)
(makes 12 - the instructions are not to double the recipe, just make a second batch if you need more)

These cupcakes are really easy to make - they only require a whisk and a few bowls. They are light and moist, and the chocolate flavor comes through beautifully. Also, these are wonderful to decorate because they bake up fairly flat. I was extremely pleased with them, as you can tell!

8 tablespoons (1 stick) unsalted butter, cut into 4 pieces
2 ounces bittersweet chocolate, chopped
1/2 cup (1 1/2 oz) Dutch-processed cocoa
3/4 cup (3 3/4 oz) unbleached all-purpose flour
1/2 teaspoon baking soda
3/4 teaspoon baking powder
2 large eggs
3/4 cup (5 1/4 oz) sugar
1 teaspoon vanilla extract
1/2 teaspoon table salt
1/2 cup (4 oz) sour cream

Preheat the oven to 350F and prepare a standard-sized muffin pan.

In a double boiler or a heat-proof bowl set over barely simmering water (not touching the water), combine the butter, chocolate and cocoa. Heat until the butter and chocolate are melted and whisk until smooth. Set aside to cool until just warm to the touch.

In a small bowl, whisk flour, baking soda and baking powder.

In a large bowl, whisk the eggs just to combine - then add the sugar, vanilla and salt and whisk until smooth and fully incorporated. Add cooled chocolate mixture and whisk until combined.

Add the flour and sour cream in three additions, beginning and ending with the flour. Whisk only until each addition disappears into the batter. Don't overmix, but make sure the dry and wet ingredients are fully combined before proceeding.

Divide the batter evenly among 12 muffin cups and bake for about 18-20 minutes, or until a tester inserted into the middle of a cupcake comes out clean. Cool in the pan for 5-10 minutes and then set on a rack to cool to room temperature before icing.

Strawberry Swiss Meringue Buttercream

[I've had great success with Martha Stewart's recipe and this time, I scaled it down a bit and added strawberry puree for some tartness and for that lovely pink color. I was a little light-handed with the frosting, so there was buttercream left over which you can save in the freezer for about 3 months - just bring it to room temperature and re-whip before using. Don't be afraid of Swiss Meringue buttercream - it's about patience and faith. Just trust me when I tell you - if you whip it enough, it will work out.]

4 egg whites
3 sticks of unsalted butter, room temperature
1 cup sugar
1 tsp vanilla extract
pinch of salt
8 oz (about 1 cup) strawberries, fresh or frozen (if using frozen, thaw)

Puree the strawberries and pass through a fine-mesh sieve; set aside.

Place the egg whites, sugar and a pinch of salt into a heat-proof bowl set over barely simmering water (make sure the bottom of the bowl doesn't touch the water and that steam doesn't get out). Whisk constantly until the sugar has dissolved and the egg whites are hot to the touch - when you rub the mixture between your fingers, it should be smooth, without granules of sugar.

Transfer to the bowl of a mixer, making sure no condensation from the other bowl gets into the egg whites. Whip with a whisk on high speed until the egg whites form stiff (but not dry) peaks and are glossy, about 10 minutes.

Cut the butter into 1 tbsp pieces and add it, one piece at a time, until it's completely incorporated. It's important that the butter is really at room temperature. Continue beating on high speed. The mixture will first look like curdled soup; then, it will look like curdled cream; then, just when you're ready to cry and give up in despair, it will magically transform into wonderfully smooth buttercream. Trust me, this will happen.

Switch to a paddle attachment and, with the mixer on low speed, add the vanilla. Beat for about a minute until incorporated. Then, still on low, gradually add the strawberry puree and beat for 3-4 minutes, until the strawberries are completely incorporated and all the air pockets are gone.

Decorate the cupcakes!

Martha says that you can make this up to 3 days in advance and store in an airtight container in the refrigerator - just bring to room temperature and re-whip with the paddle attachment until smooth, about 5 minutes. You can also store in the freezer for up to 3 months.


Continued after the jump...

Wednesday, May 20, 2009

Nutella Chocolate Cake

Shoosh cake

Sometimes, a cake is not just a cake. See, when you're friends with someone for fourteen years, when you've been through the ups and downs of life together, when you've cried and laughed and found life a little ridiculous and wonderful together, a 30th birthday cake is kind of like a summation of all those nights we stayed up until 3am propounding theories about the boy who went to Jamaica and discussing the relative merits of Bakery Boy 1 vs. Bakery Boys 2 & 3 (don't ask, you don't want to know). The trips to Palm Springs, the times we went shopping and bought the same outfit (and didn't even get mad at each other), the almost-being-pulled-over-by-the-cops-while-sort-of-kind-of-tipsy and the one jaywalking ticket we had to split between the two of us (as well as the Haagen-Dazs ice-creams we always shared). We were probably the only ones who voluntarily read Anna Karenina in high school (and loved it). Holding each other's hand through the loves that never were and celebrating birthdays, graduations, new jobs, and even a wedding (guess who watched My Big Fat Greek Wedding with me the night before I got married and peeled the petals off of 10 dozen roses? And guess who laughed at me the entire time?). So many memories, so much love, and I tried to fit it all into one cake.

shoosh cake

Oh, but it was, it was a cake. Two thick, chocolaty layers filled and frosted with the most luscious, sweetest Nutella Swiss buttercream that you can imagine, and even a double layer of prime California strawberries in between. Because that's just what this girl likes, you see, and if a friend like that likes things like these, well, it's just a match made in heaven, isn't it? This cake could only go one way, and hoooo boy, did it ever.

Chocolate Nutella Cake

Happy birthday, my dear friend, and here's to many, many more birthdays and memories to be shared!

For the chocolate cake, I used one of my favorite birthday cake recipes from "Sky High," one of my favorite (probably the favorite) cake books. The cake is super moist and chocolaty and the coffee gives it an extra depth of flavor that I really enjoyed (you can use decaf if you don't drink coffee). The Nutella buttercream? I just winged that. All you need to know is that I used almost a cup of Nutella - I highly recommend it. Don't be intimidated by Swiss buttercream - once you know what to expect (and I'll tell you exactly what that is), it's really very easy to make and tastes way way better than the "simple" buttercreams that only use butter and powdered sugar.

To frost and fill the cake (mine was a 9x13 two-layer cake), arrange the first cake layer on a cake board. Spread a layer of buttercream about 1/2-3/4 inch thick on the layer. With a large round piping tip, pipe a border of buttercream along the outer perimeter of the cake. Hull and slice the strawberries (I use about 1 lb), and arrange them in two layers on top of the buttercream. Reserve a few as decoration for the top of the cake, if you'd like. Place the second cake layer carefully on top. Coat the top and sides with a thin layer of buttercream (that'll be your crumb coat) and refrigerate for at least an hour or until the buttercream is very firm. Then, decorate with the rest of the buttercream. I used Nutella to pipe the letters - bad idea, it pipes horribly (as you can tell from the picture) so next time, I will probably just melt a little bit of dark chocolate and use that for piping the letters.

Chocolate Butter Cake
Sky High: Irresistible Triple-Layer Cakes

A few notes about the cake:
(1) The recipe makes a three-layered 9-inch round or 8-inch square cake. However, I made mine a two-layered 9x13" cake and I thought that turned out really well. The layers were thick, but there wasn't *too* much cake, if you know what I mean. The size fed about 30-40 people (depending on how thickly you slice it) and seemed perfect for a birthday cake. However, I'd love to make the tall tall tall 9 or 8-inch version one of these days!
(2) This cake is pretty sturdy and yet, I had trouble (because of the size) lifting the second layer to fit on top of the first layer. Hence, I would really recommend wrapping the cake in plastic (3 layers) and freezing for a few hours or until the cake is firm. Then, it won't break when you're maneuvering the layers.
(3) Remember that as a butter cake, it will be dense if you eat it straight out of the refrigerator. Make sure to leave it out for at least a half hour to an hour before serving so you get maximum fluffiness. The buttercream holds up very well to all kinds of weather, so you can leave it out even if it's fairly hot.

3 cups cake flour
3 cups sugar
1 1/2 cups unsweetened cocoa powder (not Dutch process)
3 teaspoons baking soda
3/4 teaspoon ground cinnamon
3/4 teaspoon salt
3 sticks (12 ounces) unsalted butter, at room temperature
1 1/2 cups buttermilk
3 eggs
1 1/2 cups freshly brewed coffee (or decaf - I use instant coffee), cooled to room temperature

Preheat the oven to 350F. Butter or spray your cake pans (or pan, if you, like me, only have one 9x13 cake pan and can bake one layer at a time) and line the bottoms with parchment paper cut to size. Butter or spray the paper.

In a large mixer bowl, combine the flour, sugar, cocoa, baking soda, cinnamon, and salt. With the electric mixer on low speed, blend for about 30 seconds. Add the butter and buttermilk and blend on low until moistened. Raise the speed to medium and beat until light and fluffy, 2 to 3 minutes. At this point, please make sure to scrape the bowl very very often because the little deposits of flour, sugar and cocoa can really sneak up on you.

Whisk the eggs and coffee together, and add to the batter in 3 additions, scraping down the sides of the bowl and beating only until blended after each addition. In the end, stir carefully, bringing up the batter from the bottom of the bowl to make sure all the batter is at an even consistency. Divide the batter among the prepared pans (if you are using 9-inch round or 8-inch square pans, each pan will take about 3 1/4 cups of batter; if you are only using two 9x13-inch pans, well, you can do the math, right? And if not, just eyeball it like I do).

Bake for 38 to 40 minutes, or until a cake tester or wooden toothpick inserted in the center comes out clean. Carefully turn the cake layers out onto wire racks and allow to cool completely. Remove the paper liners only when they are cool. (to frost, wrap tightly in plastic and freeze for a few hours).

Nutella Swiss Buttercream (also called Swiss Meringue Buttercream)
Nutella added to my favorite Swiss Buttercream recipe from (who else?) Martha Stewart

Note: because of the Nutella addition, I found this buttercream to be not as stiff as if I had made it without Nutella, so while you probably won't be able to pipe chocolate roses with it, it still holds up extremely well to simple piped decorations and I was very pleased with it.

5 large egg whites
1 1/4 cup of granulated sugar
4 sticks (1 lb) of unsalted butter, at room temperature
1 tsp vanilla extract
1 cup Nutella, at room temperature

Place a medium sized pan with about 3 inches of water over medium heat and allow water to come to a gentle simmer. Put the egg whites and sugar in a large heat-proof bowl and set over the simmering water, making sure the bottom of the bowl does not touch the water. Whisk egg whites and sugar together constantly until the sugar is completely dissolved (when you rub the egg whites between your fingers, you should not be able to feel granules of sugar). This usually takes about 5 minutes.

Transfer the egg mixture to the bowl of a stand mixer (make sure to wipe the condensation off the bottom of the bowl which you've just taken off the heat because if water gets into the egg whites during transfer, they won't whip up properly). Whip on medium-high speed until the whites hold firm peaks and are cool to the touch.

Meanwhile, cut the softened butter into 1 tbsp chunks (8 chunks per stick of butter) and once the egg whites hold firm peaks, lower the speed to medium and add the butter one chunk at a time, allowing it to incorporate into the egg mixture for about 20 seconds before adding the next one. Continue to add until all the butter is incorporated.

Here's the thing with buttercream: you need patience and faith. At first, the mixture will look soupy and you will a little skeptical. Then, as more butter is incorporated, it's going to look soupy and curdled, and then you will be afraid that it's never going to come together. Then, it's going to look really curdled and disgusting, and you will want to cry and throw it out. Don't, just keep mixing. I promise that just when you think it's reached its most curdled and disgusting point, it's going to magically turn into smooth, beautiful, thick buttercream.

When the buttercream is smooth, add the Nutella and mix slowly to combine, scraping down the bowl if necessary.

Continued after the jump...

Sunday, April 12, 2009

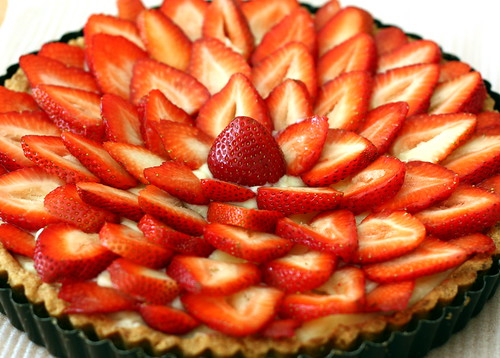
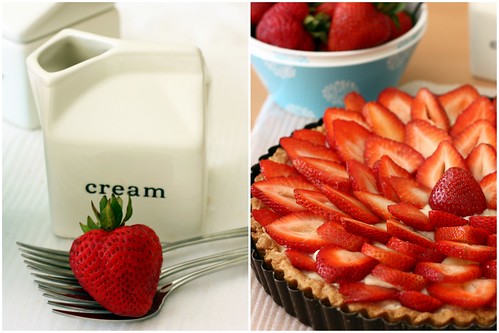
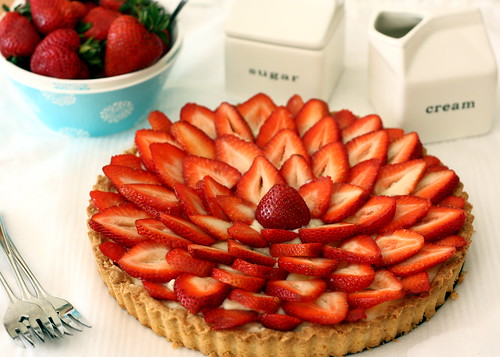
Fresh Strawberry Tart

There are times when you need to throw subtlety out the window. There are times when all that matters is glamor inside and out - a little red dress instead of a black one, sparkly eye-shadow, high heels, a bit of lace peeking out and lots of lip gloss. You know what I'm talking about, I know you do. I'm talking about a strawberry tart.

Maybe it's all the sunshine and fresh air and maybe it's just me, but I felt daring this morning - daring and bold. My mind was occupied by one thought alone - juicy red strawberries resting on silky smooth pastry cream enclosed by a light shell of pate sable baked to the perfect shade of sweetness. There is joy in every part of this tart, a spring song waiting to be sung, a celebration. It's like that little red dress that fits you oh, so perfectly. It's pure indulgence, pure pleasure. And this is the kind of pleasure you can gift freely, which is really the best part.


Fresh strawberry tart
1 fully baked sweet tart shell
1 batch pastry cream
1 lb strawberries

Fill the tart shell with pastry cream. Hull and slice the strawberries, reserving one perfect strawberry, and arrange in a circle on top of the pastry cream. Put the one reserved strawberry in the middle.

Sweet Tart Dough
(Dorie Greenspan's Baking: From My Home To Yours)

1 1/2 cups all-purpose flour
1/2 cup confectioner's sugar
1/4 teaspoon salt
1 stick plus 1 tablespoon (9 tablespoons; 4 1/2 ounces) very cold (or frozen) unsalted butter, cut into small pieces
1 large egg yolk

1. Put the flour, sugar and salt in the bowl of a food processor and pulse a few times to combine. Scatter the pieces of butter over the dry ingredients and pulse until the butter is coarsely cut in—you should have pieces the size of oatmeal flakes and some the size of peas. Stir the yolk, just to break it up, and add it a little at a time, pulsing after each addition. When the egg is in, process in long pulses—about 10 seconds each—until the dough, which will look granular soon after the egg is added, forms clumps and curds. Just before you reach this stage, the sound of the machine working the dough will change—heads up. (Alternatively, put the ingredients into a large bowl and cut the butter into the flour with a pastry cutter and then mix in the egg with a fork). Turn the dough out onto a work surface and, very lightly and sparingly, knead the dough just to incorporate any dry ingredients that might have escaped mixing. [Irene's note: if the dough is too dry and does not come together, drizzle 1-2 tbsp of ice cold water, 1 tbsp at a time, just until you can pinch the dough together without it sticking to your fingers.]

2. To roll or press the dough into the pan: Butter a 9-inch fluted tart pan with a removable bottom.

* If you want to roll the dough, chill it for about 2 hours before rolling (unless you've used frozen butter and the dough comes out of the processor firm and cold, in which case you can roll it immediately). I find it easiest to roll this dough out between two sheets of plastic film – make sure to peel away the film frequently, so it doesn't get rolled into the dough.
* If you want to use the press-in method, you can work with the dough as soon as it's processed. Just press the dough evenly over the bottom and up the sides of the pan. Don't be too heavy-handed – press the crust in so that the edges of the pieces cling to one another, but don't press so hard that the crust loses its crumbly texture.

3. Prick the bottom with a fork four or five times. Freeze the crust for at least 30 minutes, preferably longer, before baking.

4. To fully bake the crust: Center a rack in the oven and preheat the oven to 375°F.

5. Butter the shiny side of a piece of aluminum foil (or use nonstick foil) and fit the foil, buttered side down, tightly against the crust. (Since you froze the crust, you can bake it without weights.) Put the tart pan on a baking sheet and bake the crust for 25 minutes. Carefully remove the foil. If the crust has puffed, press it down gently with the back of a spoon (or prick it with the tip of a small knife). Bake the crust for another 8 minutes or so, or until it is firm and golden brown, brown being the important word: a pale crust doesn't have a lot of flavor. Transfer the pan to a rack and cool the crust to room temperature.

Pastry Cream
(Tartine - awesome, awesome book)

2 cups whole milk
1/2 cup + 1 tbsp sugar
2 large eggs
4 tbsp unsalted butter
1/4 tsp salt
3 tbsp cornstarch
1 tsp vanilla extract

Pour the milk into a heavy saucepan. Add the salt, place over medium-high heat, and bring to just under a boil, stirring occasionally. Meanwhile, whisk together the cornstarch and sugar. Add the eggs and whisk until smooth (don't let the eggs and sugar stand together for too long or else the sugar will cook the eggs *so I've heard*).

When the milk is ready, slowly drizzle about 1/3 of the hot milk into the egg mixture, whisking continuously. Pour the egg-milk mixture back into the hot milk and continue whisking until the custard is as thick as lightly whipped cream, about 2 minutes. The mixture must come just to the boiling point (slow bubbles, not boiling vigorously, or you will curdle the eggs, yuk). Remove from heat and immediately pour through a sieve into a bowl. Stir in the vanilla extract. Let cool for 10 minutes, stirring occasionally. Cut the butter into 1 tbsp pieces and whisk into pastry cream 1 tbsp at a time until smooth.

Cover the bowl with plastic wrap, pressing directly onto the top of the cream to prevent a skin from forming and put in the refrigerator to cool.

Strawberry on Foodista

Continued after the jump...

Monday, April 7, 2008

Frutiest Fruit Tart


Spring is here! Yes, the morning mists are still cold and depressing, and the thermometer barely makes it past 60, but I can tell you absolutely and unequivocally that "it" has finally come, with all its unmistakable sounds and smells and the unrestrained joy of music. The bare branches of the tree outside of my window were covered with tender green buds one day, and the next, there was a virtual explosion of a thousand different shades of color so bright, your eyes hurt to look at it -- it seems like spring came overnight this year. I pity you, those unlucky cities where Spring is still flirting capriciously with good weather. In my city, the flirtation has developed into a full fledged romance, an affair of Humphrey Bogart and Lauren Bacall proportions that sweeps every old vestige of winter away like old cobwebs. In short, goodbye, my November guest. Take your clinging silver mist and retire for another year in dignified silence. This is a time for new tastes, new colors, new life.


To celebrate spring, I made my very first ever fruit tart. Now, you must know that fruit tarts are my all time favorite dessert. Especially wee little ones, that I just think are so cute and adorable, with the not-low-fat-fantabulous pastry cream, the crumbly sweet crust and the taste overdose of fresh fruit. And I live within minutes of a French bakery that makes ooh la la fruit tarts. So it is no surprise that I've been too intimidated to make my own. It's like a date with your favorite movie star -- if it goes badly, your fantasy will be ruined forever (Christian Bale, call me. I'll take my chances with the ruined fantasy). However, I am not one to shrink from my fears, and the arrival of my Dorie Greenspan cookbook gave me hitherto unknown courage and a foolhardy optimism in my abilities. I love Dorie, and not only because she shares a last name with Alan Greenspan.


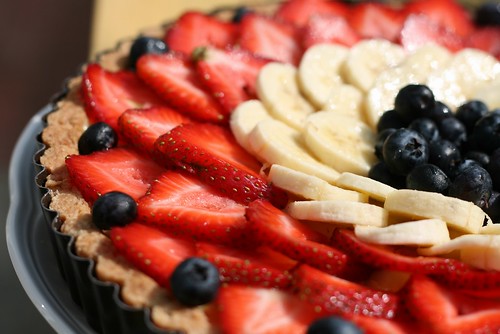
You may remember that last time I made pâte sucrée, it shrank on me like ... well, I'll let you pick your own analogy, but I'm sure you can imagine what I'm thinking. This time, I decided to entirely put my fate in Dorie's capable hands, and wow, let me tell you guys, it was a revelation. I followed the instructions to the T, using the "press in" method, and my crust DID NOT SHRINK. Yeah. Maybe it's the spring air that gave it staying power? Maybe it's my magic touch? (I suspect it's the freezing it for 1/2 hr, but please be kind and let me imagine the best). I also made her pastry cream and really, there is only one way to describe it, and the word is decadent. Juicy, crisp strawberries straight from the market, bananas salvaged from the refrigerator and tart blueberries finished off my creation. I gotta say, I was pretty proud of myself, and when we cut the tart, I was even prouder for it was amazing, although I think the credit goes all to Dorie's fantastic recipes. Hello and welcome to my bookshelf! I'll stop gushing now. Seriously, though - make the tart. It tastes like Spring is finally here, and that's the best I can say about any dessert.


I didn't futz with the recipes this time (I was too much in awe), but these have been reproduced a number of times on the web, and Dorie Greenspan likes people making her recipes, so I don't feel bad re-printing them here. Really, if you think about it, it's a service to humanity, because fruit tarts just make people happy. Don't let the length of the recipe fool you, it's really quick and easy. I made the pastry cream the night before (a breeze) and let it chill overnight.

Ingredients:
1 fully baked sweet tart crust (recipe below)
2 cups (approx.) pastry cream (recipe below)
8-10 oz strawberries, hulled and sliced
1 banana
6 oz blueberries

Bake the crust and let it cool to room temperature. Make the pastry cream and chill it (preferably the night before), and then spread chilled pastry cream inside the tart shell. Arrange fruit on top. Yeah, it's that easy.

Dorie Greenspan's Sweet Tart Crust
1 1/2 cups all-purpose flour
1/2 cup confectioner’s sugar
1/4 teaspoon salt
1 stick plus 1 tablespoon (9 tablespoons; 4 1/2 ounces) very cold (or frozen) unsalted butter, cut into small pieces
1 large egg yolk

1. Put the flour, sugar and salt in the bowl of a food processor and pulse a few times to combine. Scatter the pieces of butter over the dry ingredients and pulse until the butter is coarsely cut in—you should have pieces the size of oatmeal flakes and some the size of peas. Stir the yolk, just to break it up, and add it a little at a time, pulsing after each addition. When the egg is in, process in long pulses—about 10 seconds each—until the dough, which will look granular soon after the egg is added, forms clumps and curds. Just before you reach this stage, the sound of the machine working the dough will change—heads up. Turn the dough out onto a work surface and, very lightly and sparingly, knead the dough just to incorporate any dry ingredients that might have escaped mixing. Chill the dough, wrapped in plastic wrap, for about 2 hours before rolling.*

2. To roll the dough: Butter a 9-inch fluted tart pan with a removable bottom. Roll out chilled dough on floured sheet of parchment paper to 12-inch round, lifting and turning dough occasionally to free from paper. Using paper as aid, turn dough into 9-inch-diameter tart pan with removable bottom; peel off paper. Seal any cracks in dough. Trim overhang to 1/2 inch. Fold overhang in, making double-thick sides. Pierce crust all over with fork.

3. Freeze the crust for at least 30 minutes, preferably longer, before baking.

4. To fully bake the crust: Center a rack in the oven and preheat the oven to 375°F. Butter the shiny side of a piece of aluminum foil (or use nonstick foil) and fit the foil, buttered side down, tightly against the crust. (Since you froze the crust, you can bake it without weights.) Put the tart pan on a baking sheet and bake the crust for 25 minutes.

5. Carefully remove the foil. If the crust has puffed, press it down gently with the back of a spoon (or prick it with the tip of a small knife). Bake the crust about 10 minutes longer, or until it is firm and golden brown, brown being the important word: a pale crust doesn’t have a lot of flavor. Transfer the pan to a rack and cool the crust to room temperature.

Storing: The dough can be wrapped and kept in the refrigerator for up to 5 days or frozen for up to 2 months. While the fully baked crust can be packed airtight and frozen for up to 2 months, the flavor will be fresher bake it directly from the freezer, already rolled out–just add about 5 minutes to the baking time.

* Alternate press-in technique: If you want to use the press-in method, you can work with the dough as soon as it’s processed. Just press the dough evenly over the bottom and up the sides of the pan. Don’t be too heavy-handed–press the crust in so that the edges of the pieces cling to one another, but don’t press so hard that the crust loses its crumbly texture.

Dorie Greenspan's Pastry Cream
2 cups whole milk
6 large egg yolks (I'm going to use a few less next time to cut some calories)
1/2 cups sugar
1/3 cup cornstarch, sifted
1 1/2 teaspoons pure vanilla extract
3 1/2 tablespoons unsalted butter, cut into bits at room temperature

Bring the milk to a boil in a small saucepan.

Meanwhile, in a medium heavy-bottomed saucepan, whisk the egg yolks together with the sugar and cornstarch until thick and well blended. Still whisking, drizzle in about 1/4 cup of the hot milk– this will temper, or warm, the yolks so they won’t curdle. Whisking all the while, slowly pour in the remainder of the milk. Put the pan over medium heat and, whisking vigorously, constantly and thoroughly (making sure to get the edges of the pot), bring the mixture to a boil. Keep at a boil, still whisking, for 1 to 2 minutes, then remove the pan from the heat.

Whisk in the vanilla extract. Let sit for 5 minutes, then whisk in the bits of butter, stirring until they are full incorporated and the pastry cream is smooth and silky. Scrape the cream into a bowl. You can press a piece of plastic wrap against the surface of the cream to create an airtight seal and refrigerate the pastry cream until cold or, if you want to cool it quickly–as I always do–put the bowl into a larger bowl filled with ice cubes and cold water, and stir the pastry cream occasionally until it is thoroughly chilled, about 20 minutes.

Continued after the jump...